Christmas DIY Projects Using Tree Branches
We have lots of old trees that are always dropping branches, so we have a ready supply of junk wood to use for DIY and garden projects. There are so many ways to upcycle tree branches and logs, and today I’m sharing a few festive DIY Projects using tree branches and logs. These DIY projects are so fun to make and fairly easy too. Using natural elements is a great way to add some old fashion decorations to your holiday season. The snowman craft projects are especially fun to make with children. Plus, they aren’t just for Christmas decorations, they can be used all winter long.
Don’t have any tree branches or piles of wood in your backyard? Well, you can come over to my house because we’ve got plenty… just kidding. I bet your neighbors or family members have tree limbs or branches you can have. I’d also bet they’ve never had anyone ask for limbs or branches from their trees. Really though, it should be fairly easy to come up with the wood for these Christmas crafting projects.
This post contains affiliate links. If you click on
one of the links and make a purchase,
I may receive a small commission at no additional cost to you.
See full disclosure here.
DIY Snowman Family Made With Logs
First, we’ll start with the easiest and quickest of our DIY Projects using tree branches and logs.
Supplies and Tools:
- Logs (5 – 6 inches in diameter). Cut 3 – 9.5, 7.5 and 5 inches are the approximate heights we used.
- White Craft Paint
- Sponge Paint Brush
- Paint Markers or Vinyl Snowman Faces
- Old Sweaters or Socks
- Hot Glue Gun
- Rubber bands
Step 1 – Cut the logs to the sizes you want. My handy hubs took care of this for me. Some day I need to learn how to use his power tools. He used a chop saw, but you can use a hand saw, circular saw or whatever you have. He also scraped the bark off the logs with a wood file. Next he gave the logs a light sanding. If you want to go really rustic, go ahead and leave the bark on the logs.
As the final part of this this step, the logs will need a good cleaning. It’s cold enough here that I don’t have to worry about this, but if you live in a warmer zone, be sure your logs aren’t harboring any bugs. I simply took a paint brush and went over the logs dusting the dirt and saw dust out of the cracks and crevices.
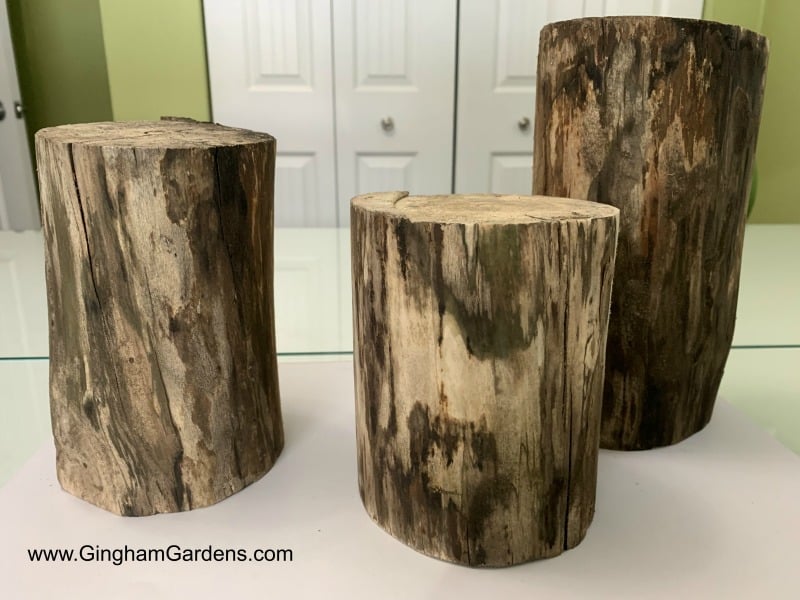
Step 2 – Paint the logs white. Don’t worry about them being perfect. A big part of the character of these log snowmen are the imperfections in the wood. Once the logs are painted to your satisfaction, sit them aside to dry.

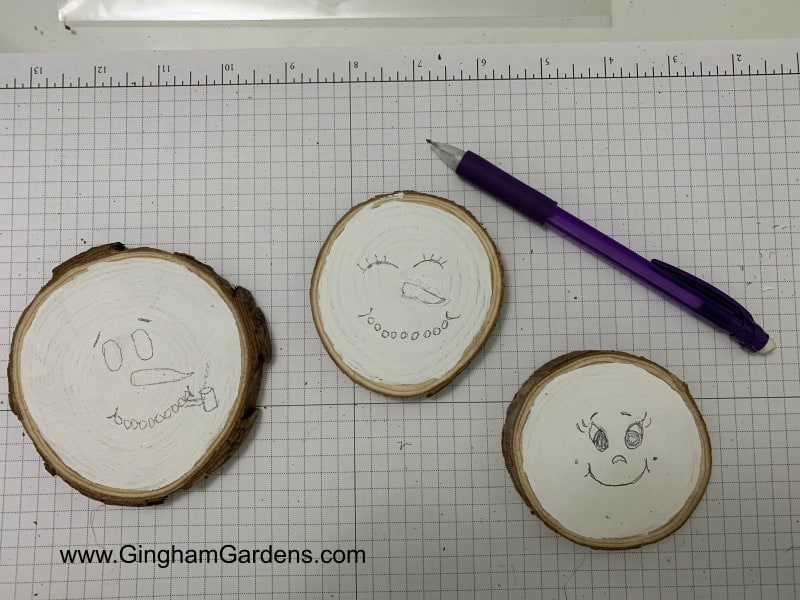
Step 3 – This next part is super fun- painting the faces on your snowmen and giving them some personality. I’ve done lots of snowman faces and no two ever turn out the same. Last year my daughter and I made snowman families out of 4 x 4s and for some reason I gave the baby snowman a pipe without even realizing what I’d done until my daughter pointed it out. We still get a big laugh out of that. In this set, the snow mama and snow papa look like they had a tiff and are still stewing over it. I still think they are cute and they make me smile. Just have fun!
Before you dive in with the paint markers, it helps to pencil on the face. If you’re afraid of messing up your logs, either use vinyl snowman faces, or be okay with painting over any mess ups.
Step 4 – It’s time to dress your snow people. I made a trip to the thrift store and bought some cheap sweaters and socks to use for snowman clothes. When I was checking out, a sweet lady said, “you’re getting some really nice sweaters.” I didn’t have the heart to tell her I was going to be cutting them up.
And really that’s exactly what I do, I cut the sweater arms to make hats and cut strips to make scarfs. The secret to making this work is using rubber bands and a glue gun.
These log snowmen would also make cute front porch decor. If you’ll be putting your snowmen outdoors, I recommend spraying them with this sealer, which also has a uv protectant that will keep the markers and paint from fading in the sun.
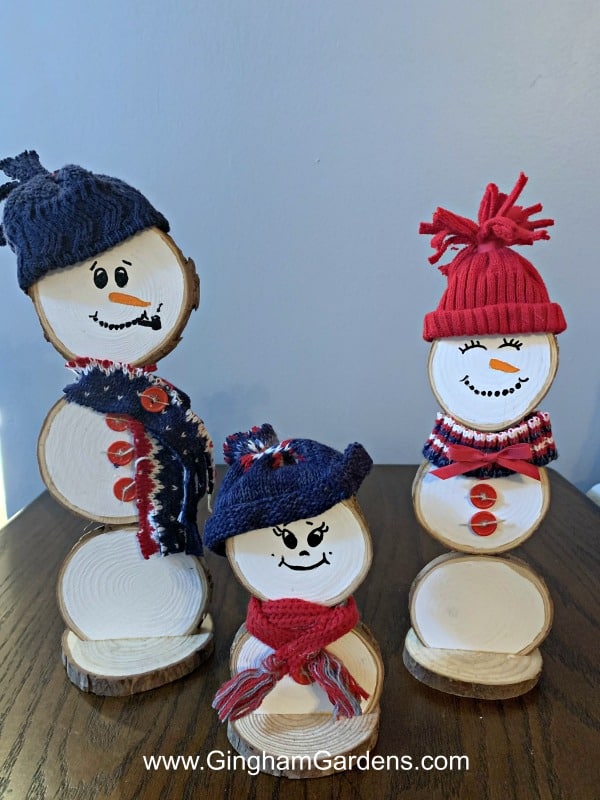
Here’s the finished product. See what I mean about the Mama and Papa with anger issues. Haha!

DIY Snowman Family Using Wood Slices
Now, for our second DIY Christmas decorations project, we made this family of snowmen with wood slices, and it’s such a cute idea. Can you tell I love snowmen? They are such a great way to spread holiday cheer! This set would make a unique teacher’s gift or a Secret Santa gift. Plus, handmade items always make the best gifts for anyone. It’s also one of those holiday decorations that can be left out all winter.
I will admit I cheated with this project and used purchased wood slices. I used these 3.5 – 4 inch wood slices and these 2.75 – 3 inch wood slices. They were clean and ready to use. I have done wood slice projects before using wood slices that my handy hubby cut, so I know it’s totally doable. But, just in case you don’t want to mess with cutting wood, this project can still be done.
With the exception of a few additions, the supplies are the same as the snowman family made with logs.
Step 1 – If you aren’t using purchased wood slices, you’ll need 11 or 12 one-half inch slices of 3 – 4 inch diameter logs. After the slices are cut, lightly sand and clean them off.
Step 2 – Paint the wood slices with white paint. I did not paint all the way to the edge. Set the wood slices aside to dry.
Step 3 – Take the bottom wood slice of each snowman and evenly cut off about a half inch. This will help the snowman to be able to stand.
Step 4 – Go ahead and paint the snowman faces. Don’t forget to pencil in the face features before using the paint markers. Use buttons, burlap squares or paint to make buttons down the front of the snowman. Buttons can also be used as eyes. Just be creative and have fun.
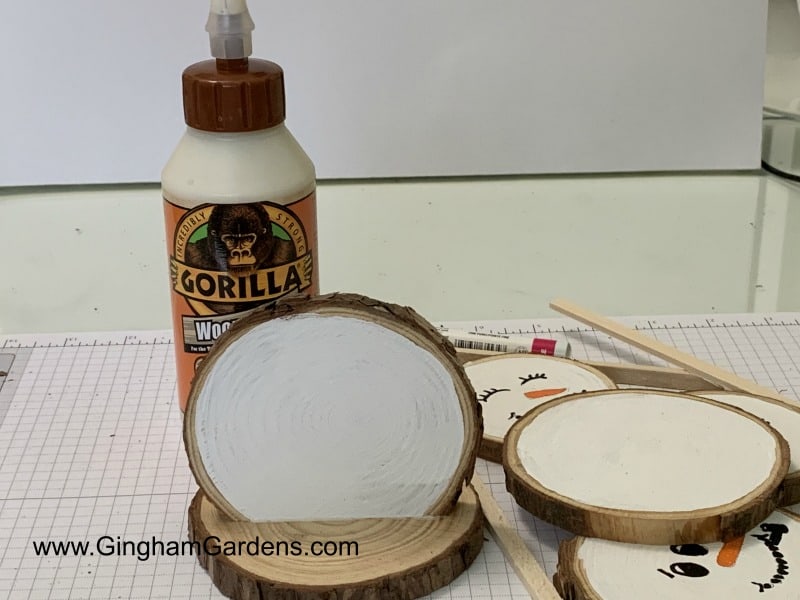
Step 5 – To assemble the snowmen, first I glued the bottom wood slice (the one from step 4) to the base wood slice. Next, I glued a balsa wood strip to the back and then glued the other pieces of the snowman to it. Instead of the wood strips, a paint stick cut down, or a plastic knife will work too. Using a strip of something solid down the back is an easy way to hold your wood slice snowman together. I used gorilla wood glue for this part of the project, because I didn’t feel like hot glue would hold. Sit the assembled snowmen aside to dry.
Step 6 – It’s time to dress up the little guys. Use strips of fabric, old sweaters or socks like in the log family project. Again, I used my glue gun and rubber bands to make the hats and scarfs and to hold them on.
Rustic Candle Centerpiece Using Logs
This festive DIY project made with tree branches was super easy and it offers a rustic elegance to my Christmas decorations that I love. It’s perfect for the centerpiece on a dining room table or coffee table. For some reason, we did a very bad job of getting process photos of these, but I’m hoping you’ll be able to figure everything out. Please feel free to ask any questions in the comments section at the bottom of the post.
Supplies:
- Logs (3 – 4 inches in diameter). Cut 3 (7, 6 and 5 inches are the approximate heights we used)
- A large log slice to set the arrangement on. A flat plate can also be used.
- Battery operated tealights
- sprigs of evergreen branches, small pine cones, berries, festive ribbon, etc. (I didn’t buy anything special for this and just used what I had.)
- Glue Gun
Step 1 – Cut the logs and lightly sand the tops and bottoms.
Step 2 – This is probably the hardest part of the entire project, but you need to cut a hole in the top of your logs for the tealight to sit in. My handy hubby used a 1.5 inch spade drill bit and that worked pretty well. The holes ended up being a little big, but they don’t really show that much and don’t detract from the overall beauty of the project.
Step 3 – Arrange the 3 logs on whatever you use as a stand. I didn’t attach the logs to the large wood slice because I think it will be easier to store.
Step 4 – The next step is to add some decor pieces and this is where you can be creative. I used small pine cones and sprigs of faux berries and greenery that I had left over from another project. You can also use burlap or ribbon, or whatever you can think of. If you love just rustic, leave it plain and your DIY log centerpiece will still look awesome. Fresh evergreen is always a good idea, but I used faux so I could store this centerpiece and use it again year after year.

DIY Decorative Deer From Tree Branches
I’ve been eyeing these wood deer for years and wanting some, but didn’t want to pay the price. Again, my handy hubs was able to make these and he said it was very easy. All the wood was from our back yard. Remember these are supposed to be rustic and imperfect. We just used what we had on hand, but wood deer would look awesome made with birch or pine branches.

Step 1 – Gather your wood and supplies.

Step 2 – Cut a piece of wood for the body, 4 pieces for the legs, 1 piece for the neck, 1 piece for the head and a small piece for the tail if you want one. The measurements depend on how large you want you deer to be. For these, one body was cut to 12 inches, one was cut to 10 inches and one was cut to 8 inches. We just winged the measurements for the other pieces.
Step 3 – Next comes some drilling. Hubs used a spade bit to drill holes in the body for the legs and neck. And, one in the head piece. Again, the measurements depend on the size of deer you are making.

Step 4 – Using wood glue, assemble the deer. Adjustments may need to be made to the legs, so the deer isn’t wonky. Use branches for the antlers. For female deer, leave off the antlers and fashion some ears from tree bark or wood.
I’m very happy with the way these turned out – not too fancy, but with a rustic feel! Although they are pictured in our backyard, I wanted them for our front porch which is a very small space. Go ahead and make these your own by adding creative touches like fresh garlands around the deer’s neck, or by using string lights to light them up at night. I’ve also seen them displayed with small ornaments hanging from their antlers.

It’s fun to step away from our regular gardening posts and bring out my creative side. So what do you think? Which project is your favorite? I hope you’ve found some inspiration to create your own festive DIY projects using tree branches or logs. Be sure to leave a comment if you have any questions, or if you just want to say hello. I love hearing from you all.
Here are some other fun DIY articles:
DIY Natural Christmas Decorations
DIY Christmas Crafts Using Twigs
DIY Garden Decor Using Tree Branches
How to Make a Winter Planter
Check out this article I wrote for Hometalk – How to Make Cute Garden Signs or Plant Tags From a Junk Wood Pile
Another fun crafty post – DIY Candle Making
If you love Gardening and DIY, then Gingham Gardens is the place for you and we’d love to have you join us.
Thanks so much for stopping by Gingham Gardens,
Julie
p.s. Follow Gingham Gardens on Pinterest for lots of great gardening ideas and tons of gardener’s eye candy. Gingham Gardens is also on Facebook – come say “hi.”
If you out of time for tackling DIY Christmas craft projects this year, be sure to save a pin to your favorite DIY Christmas board for next year.


