DIY Christmas Crafts Using Twigs
This is a continuation from previous weeks of fun, easy DIY projects you can make with tree branches, twigs and sticks from your backyard. These easy DIY Christmas crafts using twigs I’m sharing today would make some really sweet gifts, or they can also add some rustic decor touches to your own home.
These twig ornaments would be a fun family activity- from collecting the twigs and sticks from your own backyard to making the various crafts. The best part, these twig crafts are fairly inexpensive, especially if you collect the twigs and sticks yourself. The likely use for these would be ornaments to hang on your Christmas tree, but they would also make an adorable addition to gift tags, strung on garland, or any other creative way you can come up with to add to your holiday home decor.
This post contains affiliate links. If you click on
one of the links and make a purchase,
I may receive a small commission at no additional cost to you.
See full disclosure here.
Before we get started, as a convenience to you, here’s the list of supplies and tools I used. Confession time, I was too lazy to gather twigs from my backyard, although we have plenty. Plus, said twigs are soaking wet. So, for the twig project, I purchased a bag of twigs from Amazon. Seriously, who would have thought Amazon sells sticks.
Supplies & Tools Used for DIY Christmas Crafts Using Twigs
- Twigs
- Jute Twine
- Glue Gun and Glue Sticks
- Ribbon, buttons, tiny bells, etc.
- Pruners or a really sharp knife or scissors
- Ruler
DIY Twig Christmas Tree
This is not an original project, there are tons on the internet, but I could not find one article that gave good directions on how to actually make these. Perhaps I didn’t look hard enough, but I did the cutting and the measuring, and I’m sharing it with you so these twig Christmas trees will be a breeze to make.
Step-by-Step Instructions for Twig Christmas Tree:
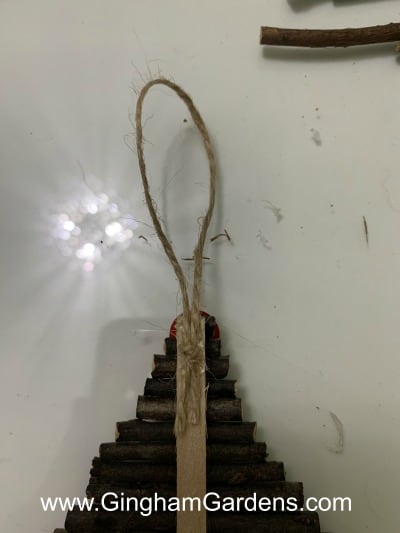
You’ll need a popsicle stick cut to 3 1/4 inches. We’ll call this the anchor piece. I didn’t have popsicle sticks so I just used a strip of balsa wood that I had on hand. I colored the bottom of mine brown with a marker.
Next, cut your twigs. I simply scratched the measurement on the twig with a pencil (a black marker would probably show up better). If you use the packaged ones that are 4 inches long this part is really easy because you can use the pieces you cut off too.
Here are the measurements: 3.25″, 3″, 2.75″, 2.5″, 2.25″, 2″, 1.75″, 1.5″, 1.25″, 1″, .75″, .50″ and .25″. So there will be 13 twigs, plus your popsicle stick or anchor piece. The pruners I used made quick work of this step. If you have pruners, go dig them out of your gardening shed because it will make this project much easier. If not, use sharp scissors or a knife.
And, here are the measurements in centimeters: 8.25 cm, 7.62 cm, 6.98 cm, 6.35 cm, 5.71 cm, 5.08 cm, 4.44 cm, 3.81 cm, 3.17 cm, 2.54 cm, 1.90 cm and 1.27 cm. Since I simply used an inches to centimeters conversion tool, you may need to do some rounding up or down to make the measurements easier to measure and cut.
Start at the top of your anchor piece, put glue on the first half inch or so. I recommend using a glue gun, the glue dries quickly and it’s easy to correct mistakes. Because of the fast drying glue, I only glued down a few twigs at a time. So you’re going to start with your 1/2″ piece first and work your way down from there. If you have children helping you, go with a craft glue like this one as opposed to using a hot glue gun.

Use twine to add a loop for hanging on the back your your twig tree.
You have the option of leaving the sweet little twig tree plain, adding a ribbon or button, or anything you choose. This is where you make the project yours.

Twig Star Ornament Craft
Step-by-Step Instructions for Twig Star Ornament
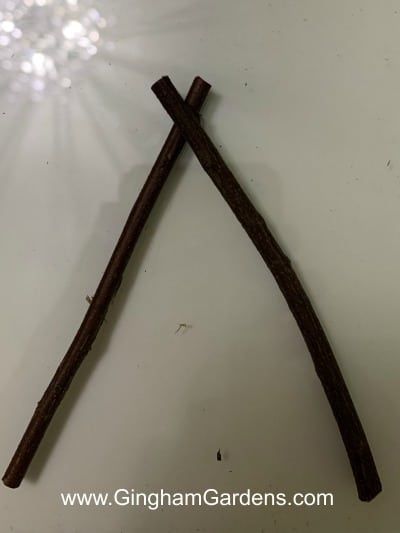
For this project, I used 5 – 4″ twigs and some jute twine (any other string or twine will work too) and my trusty glue gun.
First, lay out two twigs in the shape of a V and glue the two twigs at the bottom, criss-crossing them a tiny bit. Now, do the same thing with two more twigs.
Next, you’re going to assemble your star by laying one of the Vs on top of the other and gluing the two pieces together. Lastly, you’ll add the fifth twig to finish out the star. I found that it helped to do a simply pencil drawing of a five point star on paper so I could refer back to it. Basically, you’re going to make the shape of a star and glue it at the points where it meets.
To make the star sturdier and to add some rustic charm, I wrapped jute twine around the points and the intersecting spots of the star.

I love this rustic twig star and all of it’s wonky imperfections.

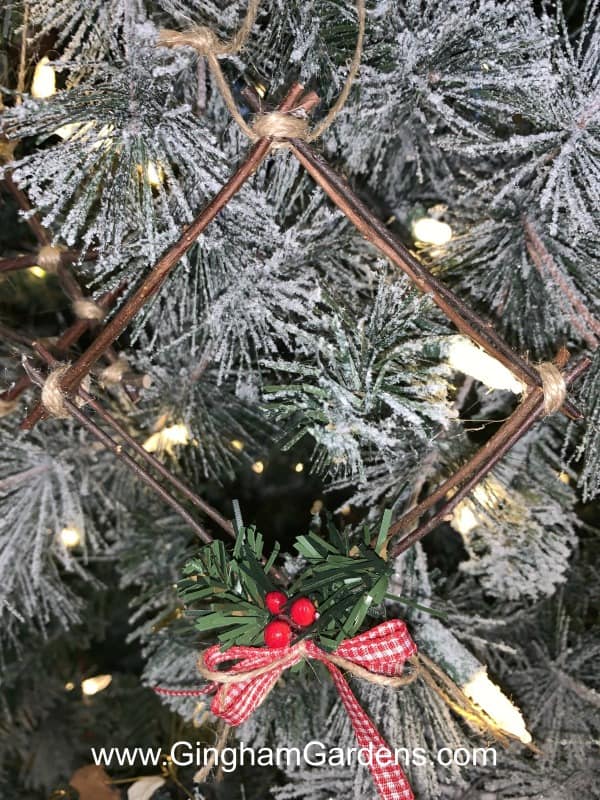
DIY Square Twig Wreath
This square wreath twig ornament turned out super cute. It could be used plain, or with a little modification, it could be used as a picture frame, or a frame for a verse or Christmas carol. I like this so much that I’m going to work on a larger square twig wreath for my front door.
Step-by-Step Instructions for Square Twig Wreath
First, you’ll need 8 – 4″ twigs. I used the skinniest twigs from my purchased pack. Simply lay 4 twigs out in a square, with the ends overlapping just a smidge and glue them.
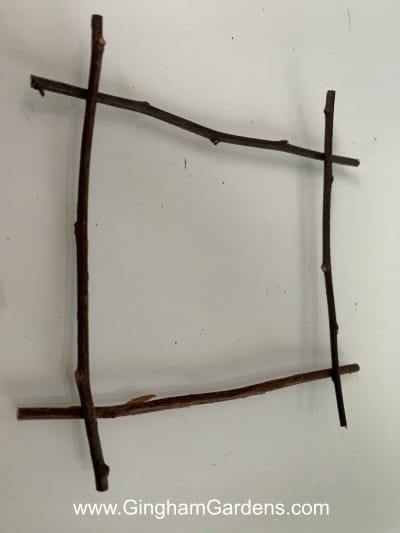
Next, do another set of 4 twigs on top of the 4 you just did and stagger them just a bit. Go ahead and glue them.
Finally, wrap jute twine around the four corners and add a tie loop as a hanger. Again, the little square twig wreath can be decorated however you want it or left plain. I added some greenery, berries and a bow made with supplies from my stash.
Tada, super cute, right!
What fun DIY craft projects to make. Once you have all your supplies and tools assembled, these simple DIY Christmas crafts using twigs go fairly quickly. These would make super cute gifts too. Think – teachers, secret santa, co-workers, hostess, family or friends.
Order your supplies and plan your craft project:
- Twigs
- Twine
- Glue Gun and Glue Sticks
- Ribbon, buttons, tiny bells, etc.
- Pruners or a really sharp knife or scissors
In case you’re in a time crunch, sign up for Amazon Prime’s free 30-day trial subscription and have your supplies delivered to your door step in approximately two days.
So what do you think? I hope you’ve found some inspiration and ideas here today. Do you want to make a few or a bunch of these simple DIY Christmas twig crafts? Be sure to leave a comment if you have any questions, or if you just want to say hello. I love hearing from you all.
Here are some other DIY articles you’ll enjoy:
Festive DIY Projects Using Tree Branches and Logs (more really cute craft projects – check them out)
DIY Garden Decor Using Tree Branches
How to Make a Winter Planter
Check out this article written for Hometalk – How to Make Cute Garden Signs or Plant Tags From a Junk Wood Pile (these would make a really cute gift for a gardener)
Another fun crafty post – DIY Candle Making
In case your interested, here’s a really great gift guide for gardeners, Creative Gifts for Gardeners, for that special gardener in your life… even if it’s you.
If you love Gardening and DIY, then Gingham Gardens is the place for you and we’d love to have you join us.
Thanks so much for stopping by Gingham Gardens,
Julie
p.s. Follow Gingham Gardens on Pinterest for lots of great gardening ideas and tons of gardener’s eye candy. Gingham Gardens is also on Facebook – come say “hi.”
Pins to share:


