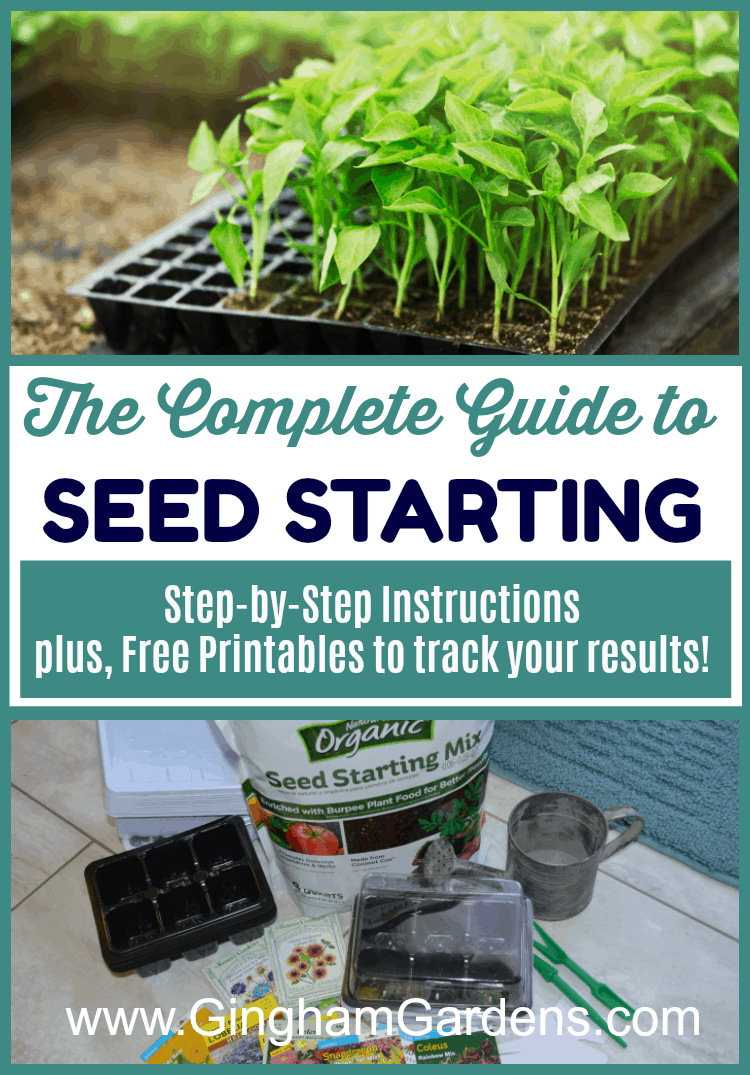
Seed Starting Indoors (The Complete Guide)
It’s time to start thinking about Spring, garden planning, and seed starting. Spring may be a ways off for your but that should not stop us from getting excited about the prospect of green and growing things. Seed starting indoors is the best way to get a head start on the upcoming growing season.

I’m not going to say seed starting indoors is easy, because it’s not. So if you see “10 Easy Steps” referring to seed starting don’t believe it. Well okay, the actual process of putting some seeds in dirt is easy, but once the young seedlings start sprouting, they take a good amount of time for care daily.
My advice to those of you who have never done seed starting is to start with one or two trays your first time. In trying to keep it as simple as I can, I am sharing my tried and true, step-by-step instructions for seed starting indoors.
This post contains affiliate links. If you click on
one of the links and make a purchase,
I may receive a small commission at no additional cost to you.
See full disclosure here.
Indoor Seed Starting Supplies:
- Seed Starting Chart available in the Gingham Gardens Free Gardening Printables Resource Library. With this handy chart, you can keep track of your successes and failures, so that you can refer back to it next year.
- Seeds – did you collect your own seeds last fall? If not, most garden centers and big box stores have their packages of seeds out. For mail order, I like Botanical Interests (wins the prize for most gorgeous and informative seed packet, plus great seeds), Select Seeds, and Johnny’s Seeds. I’ve found that these seed companies have more a variety than the big box stores. Please note: if the seed packet says to direct sow, it’s not a good idea to try and start those types of seeds indoors.
- Seed Starting Potting Mix – if you’re trying to do this on the cheap, don’t skip a good seed-starting mix, and definitely don’t use regular garden soil. Most soil mixes made for seed starting are light and fluffy and consist mostly of peat moss.

- Seed Starting Pots or Containers – I do not like peat pots, they dry out way too fast. I’ve used both plastic and peat pots and I have much better success with plastic. I use pots that are big enough to allow the roots a little room, so I don’t have to transplant the seedlings into bigger pots before moving them outside.
If you’re just starting out, you can use yogurt containers, or plastic or styrofoam cups. Just make sure to poke drainage holes in the bottom of your container. Even though you will see them all over Pinterest, I would not use egg cartons to start seeds. Just like peat pots, they dry out too quickly.
Also, egg cartons are too small and the seedlings will have to be transplanted early on. The same thing with toilet paper rolls – the cardboard wicks the moisture out of the soil and away from your seedling roots.
- Plastic trays to hold the pots – I like the ones with the domes. The dome acts like a little greenhouse and it helps to retain heat and moisture to give your seeds a good start.
- The BEST Seed Starter Cell & Tray Sets – This style is hands down the Best Containers and Trays for Seed Starting that I’ve ever used. They come in packs of 10 and include a watertight base tray, clear plastic dome lids, a seedling poker thingy for planting the seed, a gadget to assist with transplanting, and plant labels.
They are available in both small and larger sizes and work perfectly for starting smaller batches of seeds. These seed starter cell and tray sets are strong and sturdy and will last for several years. The first year I used them, they quickly became my favorites.
- Proper Lights – sorry a window with direct sunlight is just not enough light. You’ll end up with leggy seedlings that will flop over. My setup consists of cheap shop lights with hanging chains. There are all kinds of fancy light setups available and if you have the money to spend go ahead and try them. The 48″ shop lights available at big box stores work just fine.
- Fluorescent bulbs – I just use the cheap ones, really nothing special and I’ve started many, many seeds indoors and had great success with just the regular fluorescent lights. Last year, I started switching over to LED bulbs because I needed to replace some of my old fluorescent bulbs.
I use a mix of cool and warm bulbs. I don’t think it matters to your seed-starting efforts, but in the long run, LED bulbs are cheaper to operate. A fancy grow light is not necessary.
- Shelving – this is the shelving unit I use. Because the width on this one is 48”, it works perfectly for the 48” shop lights. It’s very easy to hang shop lights on it and to be able to adjust them. There are lots of DIY seed starting set-ups on Pinterest, but I really love this style because of the ability to hang the shop lights and I don’t have to worry about water on the shelves when I’m watering. It’s definitely an investment upfront, but I’ve been using mine for several years.
- Power Strip with a timer, or a separate timer. I never remember to turn the lights off and on, so very early on in my seed-starting venture, I knew I would need a timer.
- S-hooks to hang the shop lights.
- Chains to hang the lights (if your lights don’t already come with them).
- A small fan (I use a clip-on oscillating one).
- Fertilizer (I use Fish Emulsion for my veggies, and just watered down MiracleGro for my flowers).
- Plant Tags and paint marker.
- Watering can and spray bottle.
Here’s a Pin to save to your Gardening Board on Pinterest for later reference. There are more pin collages to share at the bottom of the page. Thanks for pinning!
Getting Started
If you’re a beginner, start small and choose 5 or 6 flowers or veggies to start with. Some really easy seeds to start indoors are tomatoes, cucumbers, marigolds, zinnias, and nasturtiums. Don’t start them too early though.


When to Start Seeds Indoors – Timing
So this step requires a little math, but don’t worry, it’s easy.
First of all, you’ll want to know the last frost date for your zone. Dave’s Garden website has a cool page where you can enter your zip code and it will tell you when your last frost date is. Check it out here. Don’t know your gardening zone, you can look that up here.
You can find charts online that refer to “when to start seeds inside,” but they don’t take into consideration what gardening zone you are in and when you can plant outdoors and those are important factors to consider.
Next, look at your seed packet and it should tell you when to start your seeds. For example: I live in Zone 4b so my last frost date is somewhere around May 1st. The seeds that I’m starting say to sow indoors 8 weeks before the danger of frost has passed. So counting back 8 weeks from May 1st, I come up with March 6th. I will start these seeds sometime in the first week of March to have a few days to harden them off before planting them outdoors. This is a great way to utilize the Gardening Calendar that’s available in the Free Gardening Printables Library.
Read Seed Packets
There is a lot of important information on the back of your seed packet. Some companies are better than others at including information in their seed packets. Seed packets will also start the number of days until you should start seeing seed germination. So, read your seed packets.
I go through my seed packets and divide them up according to the number of weeks before the last frost date that I need to start them. Then I record the dates along with the plant names on the handy Free Printable Seed Starting Chart.
Please note that not all seeds are suitable to start indoors, they either grow too fast, or they are picky about having their roots disturbed. The seed packets will say if the seeds should not be started indoors.

Light Station for Indoor Seed Starting
Again, don’t try to start seeds in a sunny window. In most locations, there is no guarantee how much sun or bright light your seedlings will get in a window. Although natural light sounds good, it just isn’t very realistic. You’ll have much better success with an artificial light source.
Find a place where you can access each of your shelves. You’ll have to be able to move your seed trays around for watering and be able to make light adjustments. Also, think about your floor, it will most likely get water and maybe even some soil on it. You’ll want to have chains attached to your lights so that you can adjust the entire light as your seedlings grow. I highly recommend a timer, because your seedlings will need 14 – 16 hours of light per day.
I have my light setup in an unfinished part of our basement. The floor is concrete, so I don’t have to worry about spills. The entire setup is in a very small area that isn’t necessarily convenient, but it works. I say that to tell you to just use the space you have even though it might not be perfect.
Adjusting your lights – Keep the lights just a couple of inches from the tops of the seedlings. You want them close enough so the seedlings don’t stretch for the light and get leggy.
As your seedlings grow, your lights will have to be adjusted frequently. If you have several trays of seedlings, they will need to be repositioned so that each plant grows straight and gets ample light. Your seedlings will need 14-16 hours of light per day.
How to Start Seeds Indoors – Steps:
Mix the Soil
Follow the instructions on your bag of seed starting mix to prepare the soil. Most mixes need to be mixed with water. Don’t get your mix too soggy, or your seeds will rot before they have a chance to germinate. I use a bucket and alternate pouring seed starting mix in and water, and stirring between each layer.
Add Soil to the Pots
Fill your pots with soil, leaving a little room at the top for the seeds and soil to cover them. Gently tamp the soil down to eliminate large air gaps.
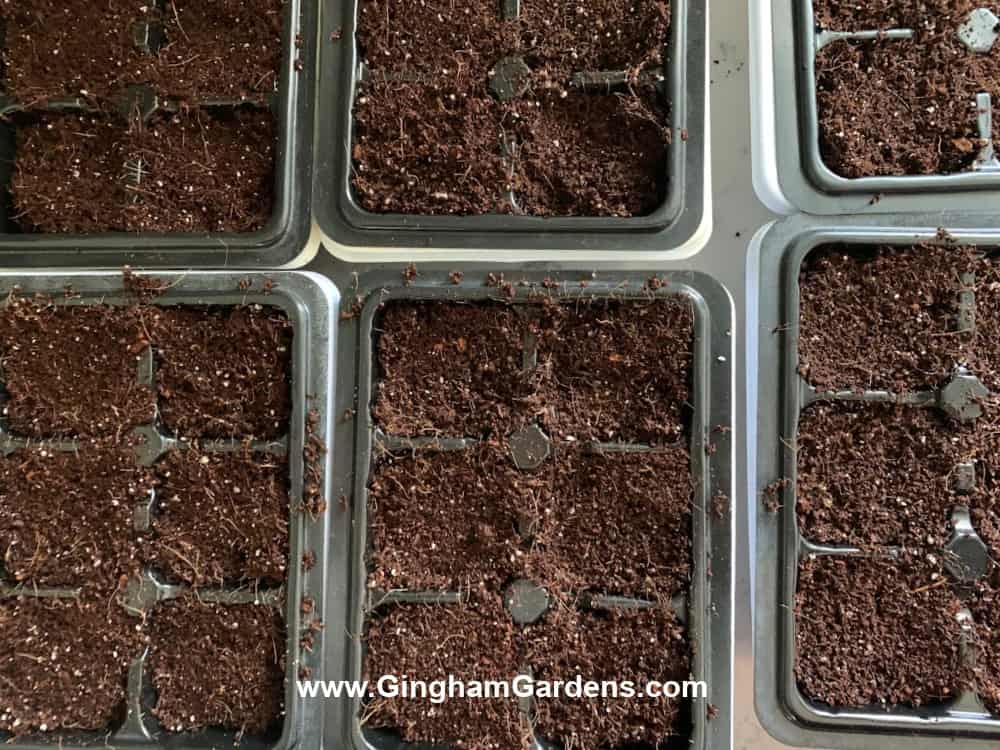
Planting the seeds
Follow directions on the seed packets as to what depth to plant the seed. A good rule of thumb is the smaller the seed, the more shallow it needs to be planted. Some teeny tiny seeds don’t even require a covering of soil. I usually plant 3 – 4 seeds per pot. I use the eraser end of a pencil (or the little gadget that comes with my favorite trays) to make a couple of indentations in the soil surface, as deep as the seed should be planted. After the seeds have been dropped, go back and cover them with soil. Once I have a tray planted, I use a spray bottle and just lightly mist the soil. Use a plant tag to label your seedlings.
Covering your newly planted seeds
Cover your trays with plastic domes, or plastic wrap to create a greenhouse effect. Some instructions say to remove the cover when you see the first signs of green, but I usually wait until the seedlings almost reach the top of the plastic cover. Once the lid is removed, make sure to check the seedlings every day. I start watering with a spray bottle and just mist the soil. Once the seedlings are bigger and their roots are established, I water them with a small watering can. Typically, when the seedlings are covered with a humidity dome, the soil will retain enough moisture so you don’t have to water them.

Heat Mats
If you have your seed starting set up in a basement, garage, or any place where the temperature is too cool, you might want to consider using a heat mat. The seeds will germinate quicker and the heat mat will serve to keep them at a consistent temperature.
Fan
As soon as all the domes come off, I set an oscillating fan on low and set it to blow on the seedlings. The breeze from the fan mimics the wind and makes the little seedlings strong. Good air circulation will also help prevent any fungal diseases.
Fertilizer
When your seedlings get their second set of leaves, it’s time to start giving them a little fertilizer. I start with a very weak mix of fertilizer and water. The next time I fertilize, I will add a bit more fertilizer to the water. I only fertilize my seedlings once a week.

Thinning Your Seedlings
I hate thinning my seedlings. To kill those sweet little seedlings that I’ve nurtured and brought to life just pains me. So I have to keep telling myself that it’s better to have one strong plant than to have a bunch of scrappy weaklings. I’ve learned over the years to not sow as many seeds in the first place, but with some of the tiny ones, it’s difficult not to over-sow. To thin, I simply snip the weakest seedlings with a pair of tiny scissors and leave two or three to thrive. Don’t pull the seedlings out because the roots of the seedlings you want to keep will be damaged.
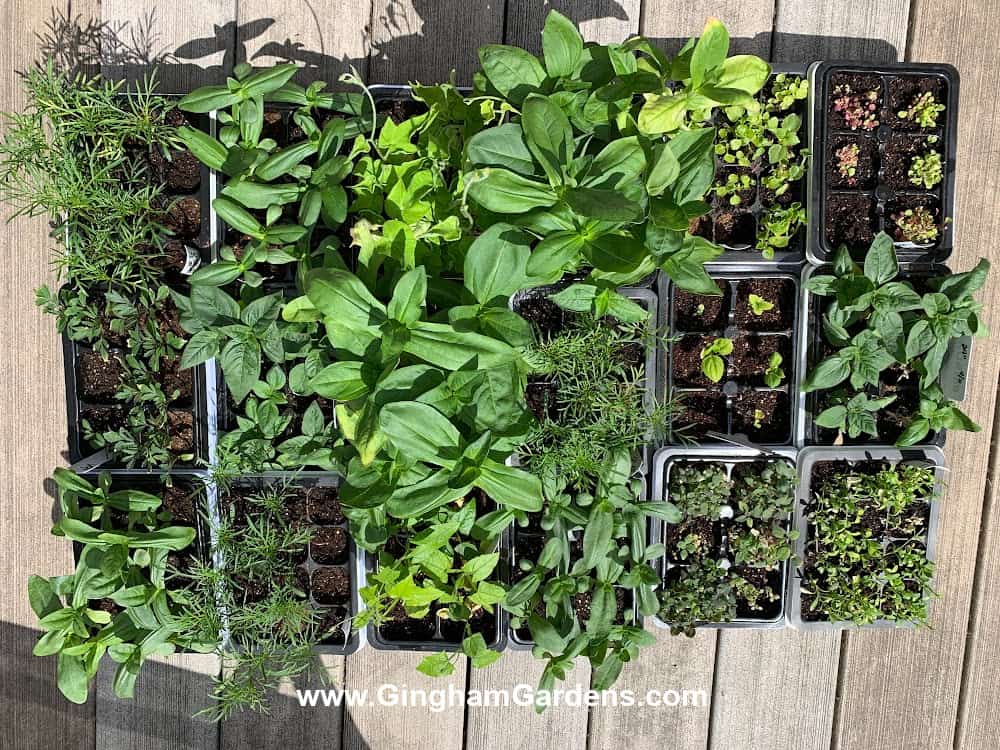
Bumping Up Your Seedlings
Are your seedlings looking crowded? Are the roots growing out of the bottom of the container? It may be time to bump up those babies to larger pots. If you have too many plants growing in one pot this is a good time to separate the seedling masses and pot them up in their own individual larger containers.
Hardening Off
Once your plants are ready to go outside, it’s a good idea to harden them off. After being in a controlled environment, they need to adjust to being outdoors. To harden off, simply sit your plants outdoors for a couple of hours at a time each day, extending the time a little each day to toughen them up. Start out by putting them in a shaded location and increase their sun exposure a little each day. However, don’t leave the plants in full sun or they will fry. I’m lucky to have a pop-up greenhouse (similar to this one) where I can harden off my baby seedlings.
Transplanting Outdoors
Now that your seedlings have been hardened off, it’s best to place them in their new home in your garden on an overcast or cloudy day. Be sure to give them a good drink of water, once they are planted. It’s normal for hardened-off plants to wilt a bit when they are first transplanted, but they will soon acclimate to their new homes and will be off and growing.
Seed Starting – Problems
How to Control Fungus Gnats
Sometimes fungus gnats can be a problem with seed starting indoors. I’ve never had them damage my seedlings, but I understand if there’s a large enough infestation, they can. I haven’t tried it, but I’ve read that sprinkling a little cinnamon on the surface of the soil will keep them away. I’ve had very good luck controlling soil gnats with these little sticky things.
How to Prevent Damping Off
If your seedlings suddenly wilt and look mushy or discolored, chances are they have damping off. There’s nothing you can do to remedy the situation, but there are ways to avoid it. Damping off can be prevented by using clean containers, new potting mix, a heating mat under the seed trays, good drainage, using a fan, and adequate light. If you would like to read more about damping off, here’s an article by the University of Minnesota Extension. I have also been reading that using a small pebble gravel (like the stuff used in fish tanks) will prevent damping off.
It’s incredibly gratifying to grow flowers or vegetables from seed. After the initial purchase of your lighting, shelving, trays, and pots, the cost is minimal. You can start small and add on every year. I encourage you to give Seed Starting Indoors a try.
If you want a much simpler method of starting seeds outdoors during winter months, check out my post on Winter Sowing.
Thanks a bunch for stopping by today to learn about seed starting. Do you start seeds indoors? Are you going to give it a try? Leave a comment and let me know. Or, if you have questions, leave a comment and ask. I would love to hear from you and be able to help with your gardening questions.
Happy Gardening,
Julie
Other posts on Gingham Gardens that you will enjoy:
Flower Gardening 101
DIY Garden Journal & Planner
Vegetable Gardening 101
Flower Garden Design
How to Jump Start Summer Blooming Bulbs
More Great Things on Gingham Gardens
Sign up to receive our weekly newsletters full of gardening tips. You’ll also get access to our Gardening Resources Library and all our helpful gardening printables.
More places to find Gingham Gardens:
- Visit Gingham Gardens on Pinterest.
- If you’re on Facebook, Gingham Gardens is also on Facebook.
- Love all things gardening? Check out our shop!
Save a pin to your gardening board on Pinterest, so you can remember this post later:


