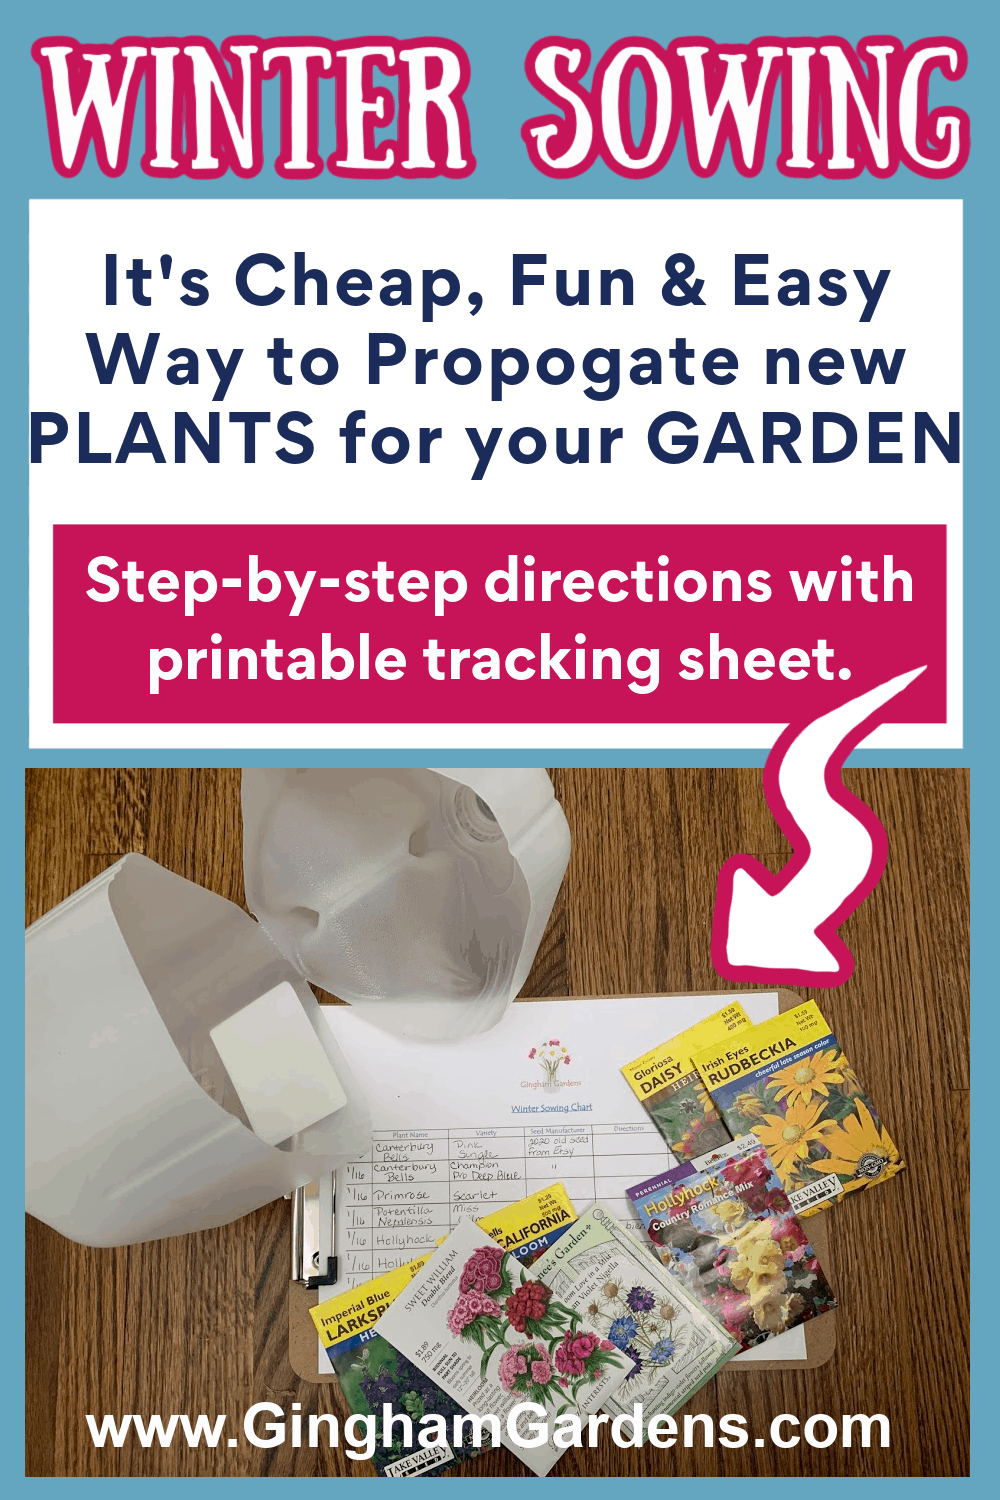
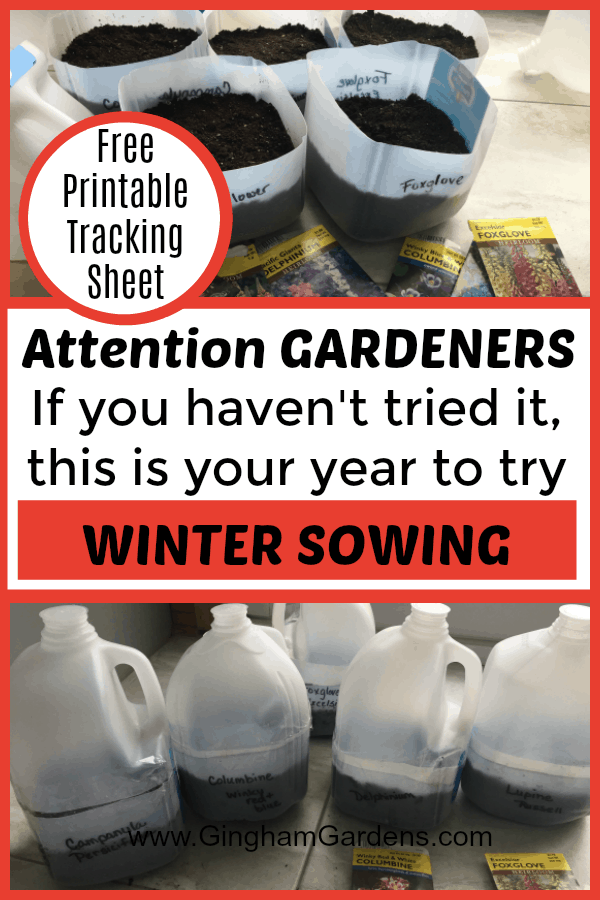
Winter Sowing (Yes You Can Garden in Winter)
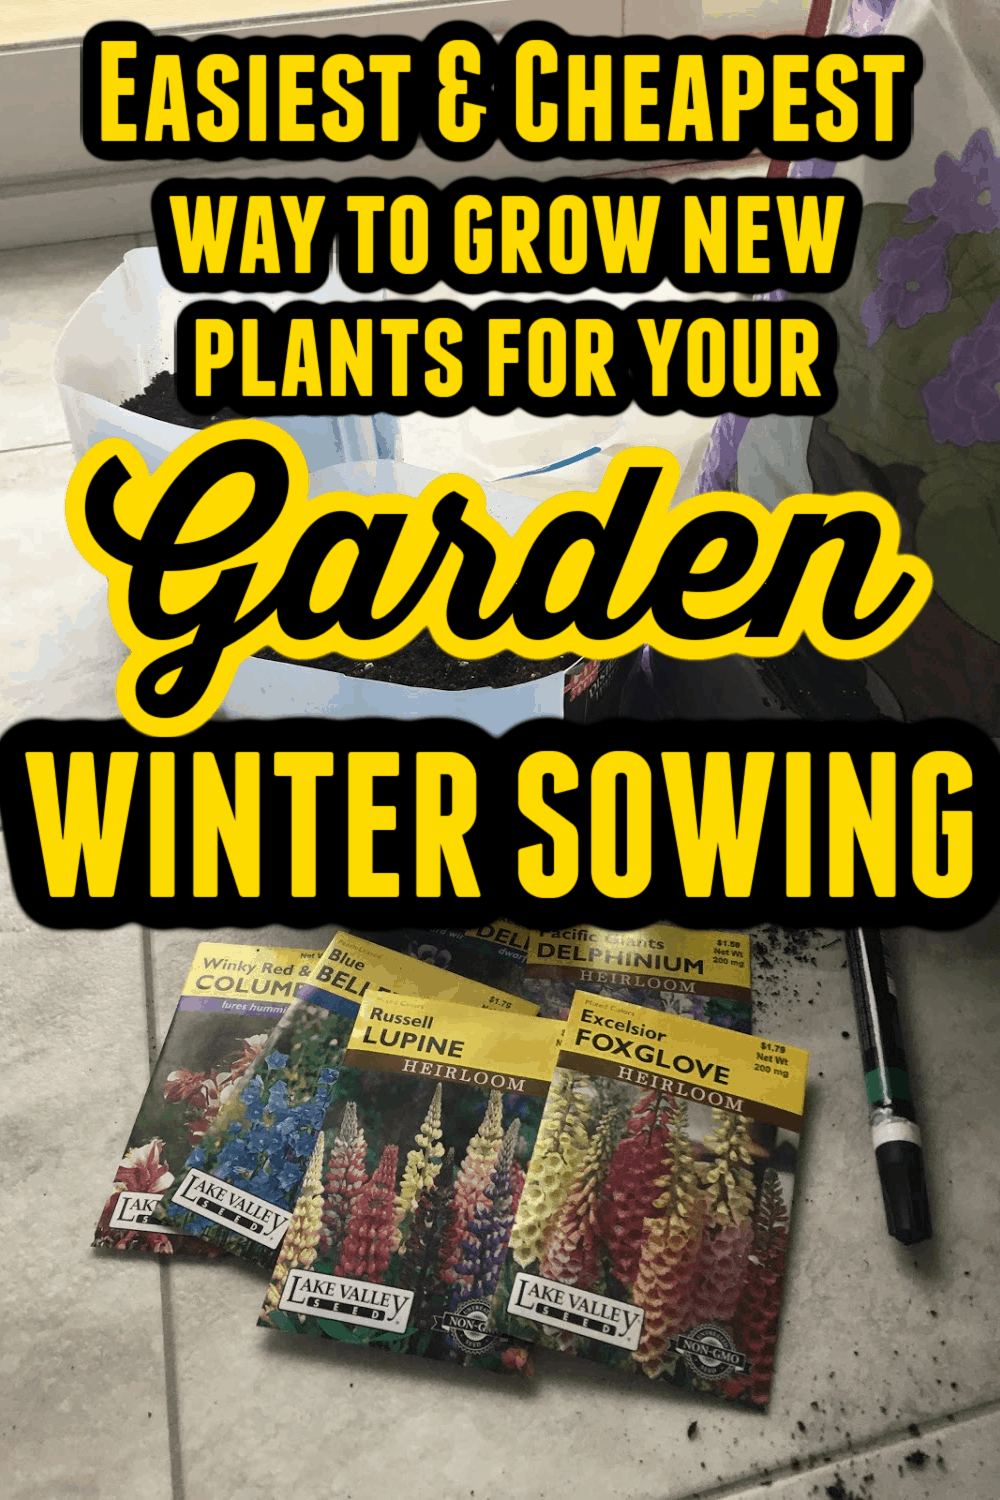
Yes, you can garden in winter, it’s called Winter Sowing. Have you ever heard of winter sowing? Winter Sowing is a method of propagating new plants for your gardens simply by starting seeds outdoors in the winter. Several years ago, I read an article in Northern Gardener Magazine written by a master gardener, with whom I later became acquainted. After seeing the results of Michelle’s winter sowing, I knew I had to try it. It’s so incredibly easy and a great way to get some beautiful perennials for your flower gardens for super cheap.
I start seeds indoors too, but maybe you don’t have the room or the money for a light setup, or the time to take care of baby seedlings. If that’s the case, then winter sowing is for you.
Winter Sowing: The What and How
What is Winter Sowing?
Winter Sowing is basically a process whereby you create mini greenhouses using translucent plastic containers. Once the seeds are sown, these little greenhouses are placed outdoors in the elements and then we let nature take it’s course. There are different methods of winter sowing, but I’m going to stick with what I know and what has worked well for me year after year.
Not only can you sow perennial flowers and hardy annual flowers, but you can also winter sow tender annuals, vegetables and herbs. At the end of the post, I share a link to a document that gives specific instructions for this.
This post contains affiliate links. If you click on
one of the links and make a purchase,
I may receive a small commission at no additional cost to you.
See full disclosure here.
And it can be a bit overwhelming if you’re new to Winter Sowing.
To make it easier to grasp, I’ve created a PDF printable Workbook/Guide
of this post, which includes all the information in this
Winter Sowing article.
Plus, some helpful planning charts and checklists
to help you be successful at Winter Sowing.
The Winter Sowing Workbook and Guide is
available for the low price of $7.00.
Simply click the button below and follow the instructions.
(Be sure to check the box to receive free updates to the Guide.)

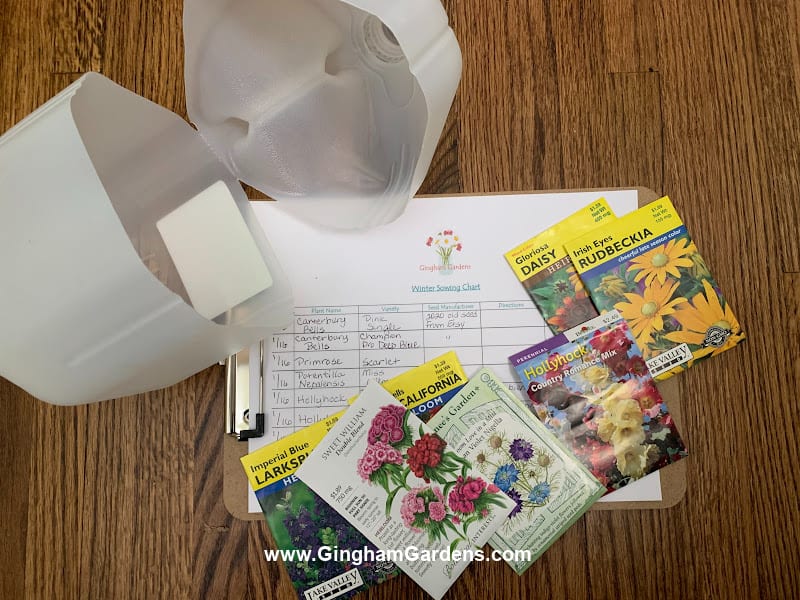
Supplies Needed:
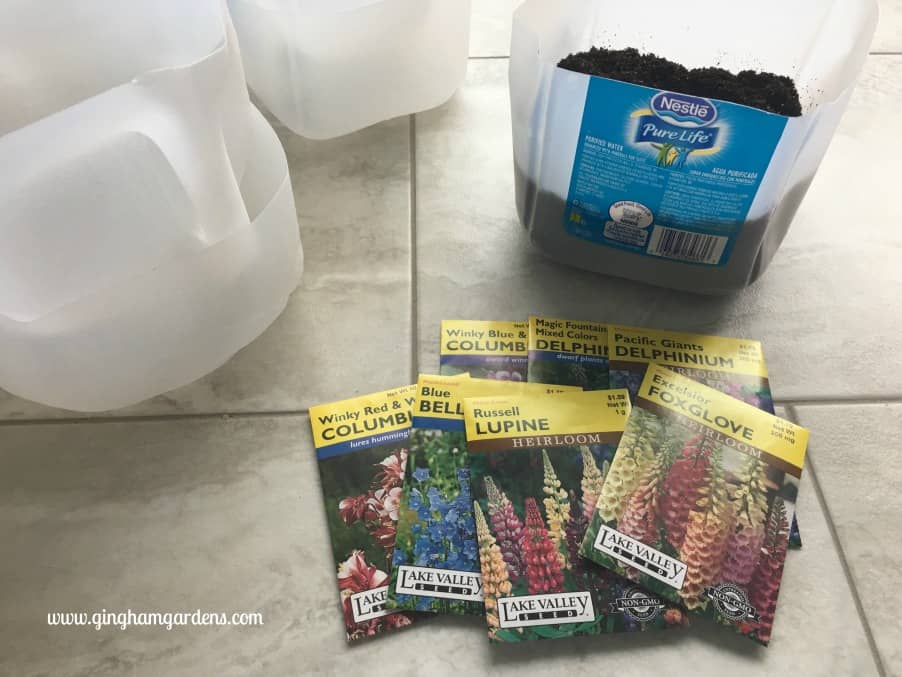
- Several clean, plastic, gallon-sized milk jugs or water jugs, plastic deli containers with clear lids, 2-liter soda bottles, vinegar jugs, take-out containers or anything else you can come up with. Just keep in mind that your containers should be at least 4 or 5 inches deep and the top of the containers should be somewhat transparent, so the sun can shine through.
- Potting mix – Don’t get too hung up on this. I’ve used cheap potting soil, a seed starting mix, miracle gro potting mix, and a combination of whatever I had. Basically you want a good soil that is light and drains well. In the dead of winter, sometimes it’s difficult to find a good potting mix, so you can’t be too picky with your soil. Just don’t use garden soil from the ground.
- Seeds – I love Botanical Interests Seeds. The seeds packets are extremely informative and beautiful! And, more importantly, I always get a great germination rate. You can use seeds you saved from your garden also.
- A marker that won’t fade (I highly recommend using a paint pen and not a permanent marker.)
- Plant tags or labels
- Clear packing tape or duct tape (I use this heavy duty packing tape.)
- A sharp knife or scissors
- Free printable Winter Sowing Chart – this chart helps me keep track of what I’ve sown and the results.
Get your free printable Winter Sowing Chart and gain access to all the gardening printables in the Gingham Gardens Resources library by completing the newsletter subscription form.
The Best Seeds for Winter Sowing:
A large part of gardening and learning is experimentation, so if you’re curious if a particular seed will work for Winter Sowing, go ahead and try it, cause you really don’t have much to lose. Here is a list of seeds that are good candidates and ones that I’ve had success with for Winter Sowing:
Perennial Seeds:
- coneflower
- black-eyed Susan
- balloon flower
- foxglove
- delphinium
- shasta daisies and painted daisies
- meadow blazingstar liatris (butterfly magnet)
- blanket flower (gaillardia)
- yarrow
- veronica
- many, many more
Annual Seeds:
- morning glory
- snapdragon
- marigold
- black-eyed Susan vine
- cosmos
- zinnia
- any annual flower that reseeds itself in your garden
Winter sowing is the easiest and best way to propagate native plants. If you are looking to add natives to attract pollinators, you will notice that purchasing native plants at your local garden center can be quite expensive. Winter sowing is a great way to get those same native plants for a fraction of the cost.
Here’s a collage for pinning to Pinterest to remind you of this post later. There are more collages at the bottom of the page. Thanks for pinning!
The Benefits of Winter Sowing
Okay, gardeners, this is the best part! Why winter sow? What are the benefits of winter sowing?
- It’s crazy EASY!
- Get a head start on spring growing.
- It takes up no space indoors.
- There are no grow lights.
- No heat mats.
- The plants don’t have to be hardened off.
- Mother Nature does all the work!
Winter Sowing Schedule
Remember, it’s winter sowing, not fall sowing. I’ve seen gardeners start winter sowing in the fall during a period of cold weather. Then a warm spell hits and their seeds start sprouting just to be zapped by frost when the weather turns cold again.
The best time to start winter sowing really depends on what gardening zone you are in. For colder zones like 3, 4 and 5, this is the general time frame that works best:
January, February and early March – winter sow perennials that need cold stratification.
Mid – Late March – winter sow hardy annuals like the ones listed above.
Late March – Early April – winter sow tender annuals, vegetables and herbs
If you are in warmer gardening zones (zones 6 and 7), you can bump your winter sowing up a few weeks and even start as early as the winter solstice.
Don’t get too hung up on a winter sowing schedule or a winter sowing calendar. The process is very simple and Mother Nature will figure out the timing for you.
Steps For Winter Sowing
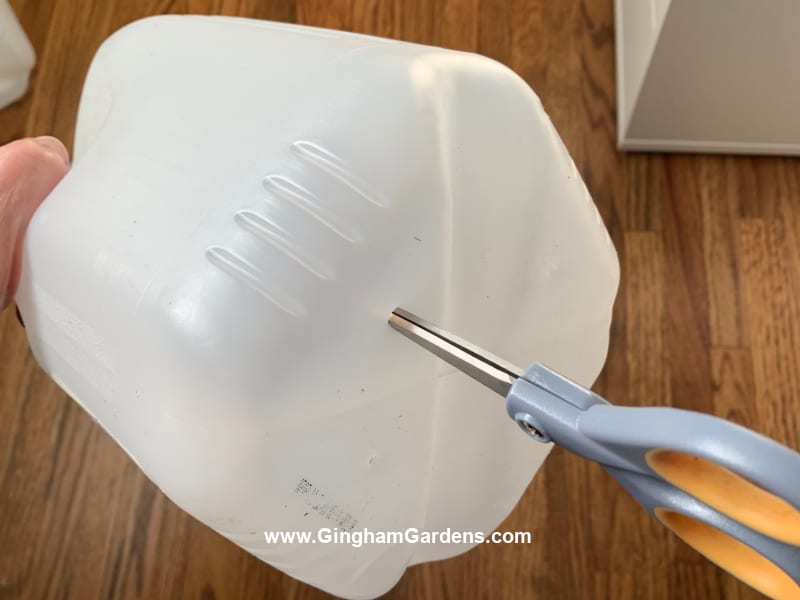
- If you use gallon jugs, cut them around the middle neatly on three sides (to create a hinged lid) leaving 5 or 6 inches for the bottom of the container. You can discard the caps.
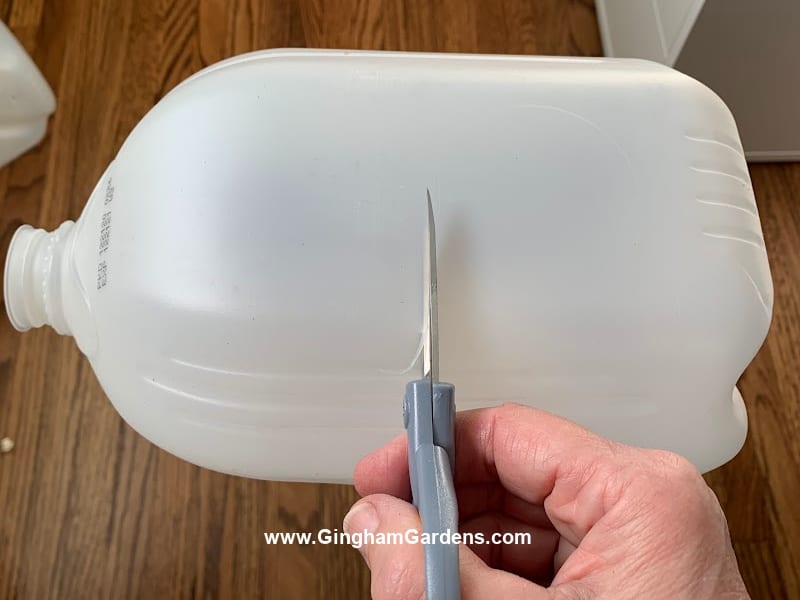
- Poke some drainage holes in the bottom of your container. Make sure the holes are big enough so that they don’t close over. Don’t forget to put a round coffee filter in the bottom to keep dirt from getting out over time!
- After putting in the coffee filters, fill your containers, or the bottom of the jug, with 3 – 4 inches of soil. Tamp it down gently to fill in air holes or pockets. Water the soil to get it fairly moist but not soggy. At this point make sure the drainage holes in the bottom of your containers are working.
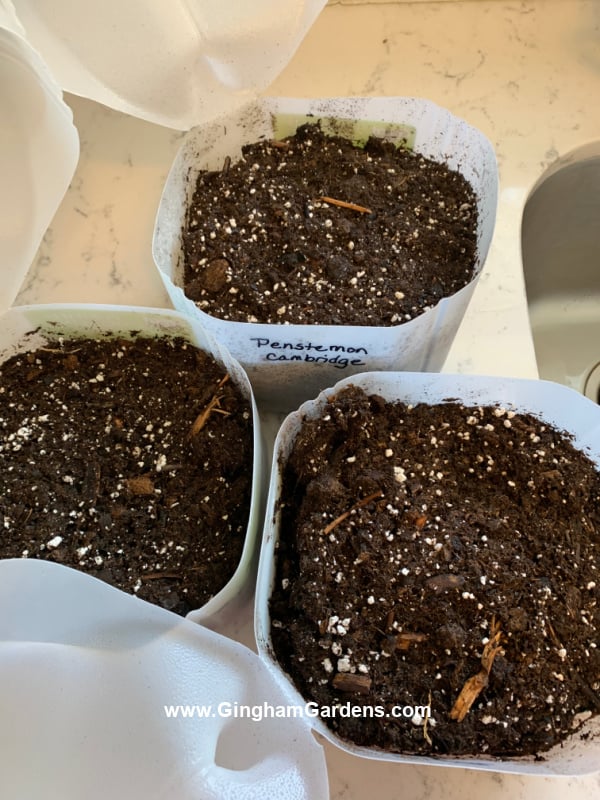
- Sow seeds according to the directions on the packet. If you don’t have the seed packet to refer to, as a general rule-of-thumb, the smaller the seed, the more shallow you plant it. Very small seeds are just spread on the surface of the soil.
- After your seeds are covered, give them a light sprinkling of water (I use a spray bottle). Skip this step if your soil is already moist.
- Write the name of your seeds on the container. Make sure to use a marker that will withstand weather elements. I also put a plant tag inside the container.
- Next you’re going to tape the lid or top of the container to the bottom. If you aren’t using a milk jug, poke some holes in the top of your taped up container for ventilation. You want your seedlings to get watered from rain and snow. Also, in the spring the holes will serve for ventilation. And there you have it – a little green house.
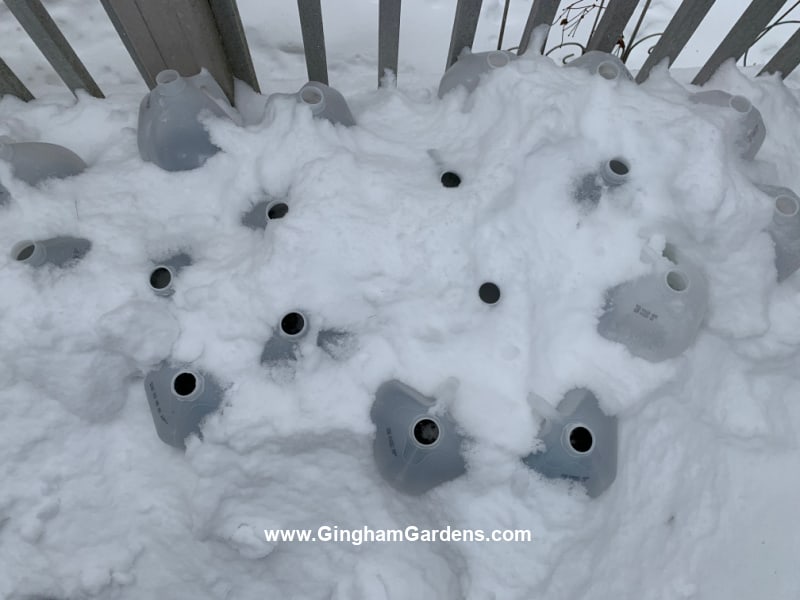
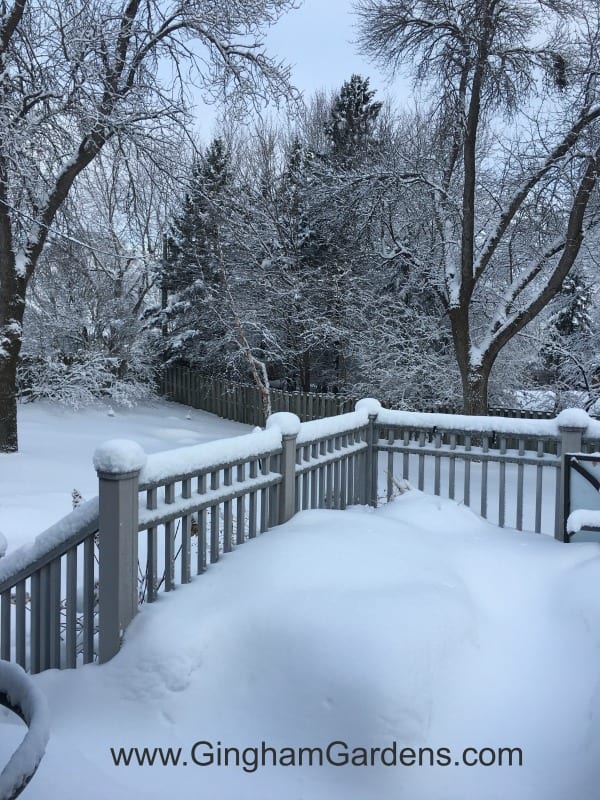
- Place your container(s) outdoors in a sunny spot. Select a spot where your miniature greenhouses are safe from strong wind and critters, but be sure they are exposed to the elements. They need moisture from snow or rain. Some seeds like perennials need a period of freeze and thaw (called cold stratification). Put your containers on a deck or porch area where they can be see and watch them in the spring.
- Now all that’s left is waiting for nature to do it’s magic. Really you’re just going to ignore those little containers for the rest of winter. Resist the urge to meddle with Mother Nature!
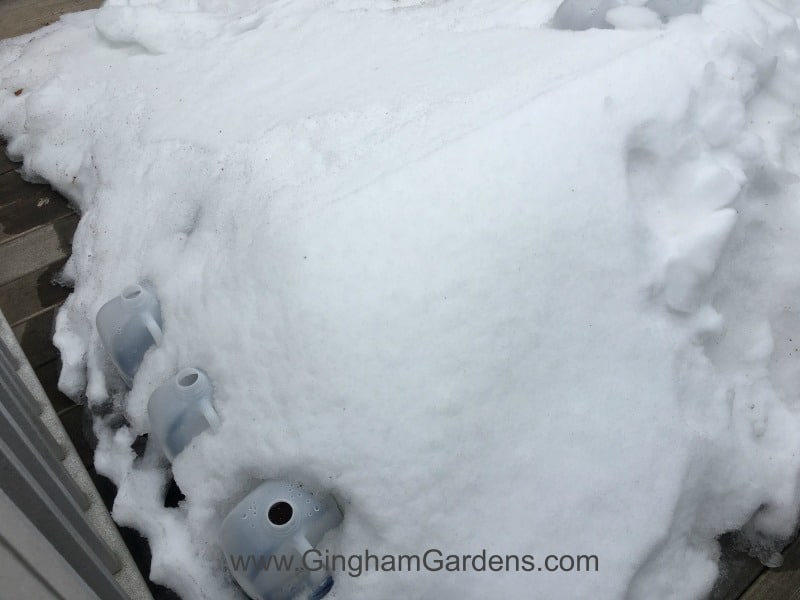
This is what a Minnesota winter looks like. Under this mound of snow on the deck are about 20 little milk jug greenhouses.
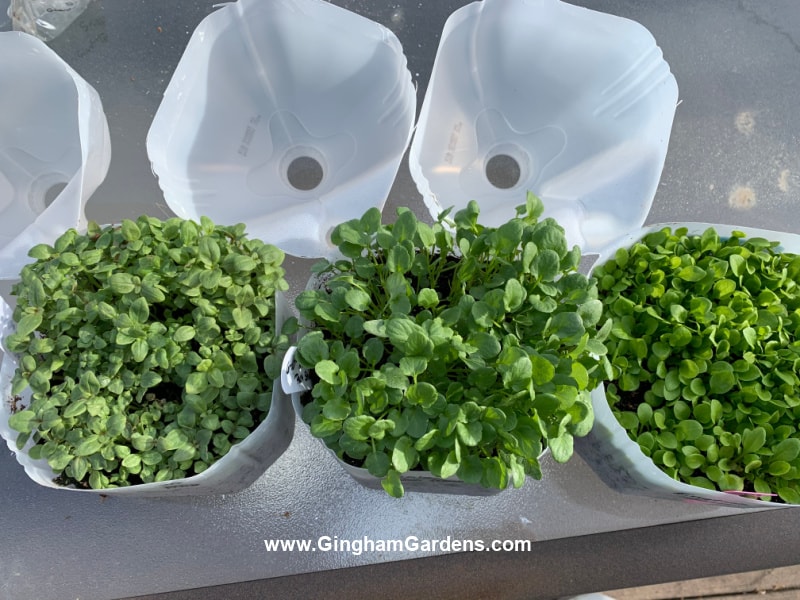
Here are the little milk jug greenhouses making an appearance in early spring!
Winter Sowing – What to Do In Spring
When the weather starts to warm up in the Spring, you’ll be able to see your seeds sprouting. At this point you’ll need to make sure your young seedlings are getting enough water and ventilation. Poke a few more holes in the top of your containers and/or loosen some of the tape to allow for more air flow. The little seedlings will enjoy some days with the lids opened completely and then closed back in the evening.
How to Plant Winter Sown Plants
Once it warms up and frost isn’t an issue, completely remove the lids. At some point, I will either divide and transplant seedlings into bigger individual pots or directly plant them in my garden. I have an area in one of my gardens especially for winter-sown plants. The young plants get to hang out here until they are moved to a permanent location in the gardens the following year.
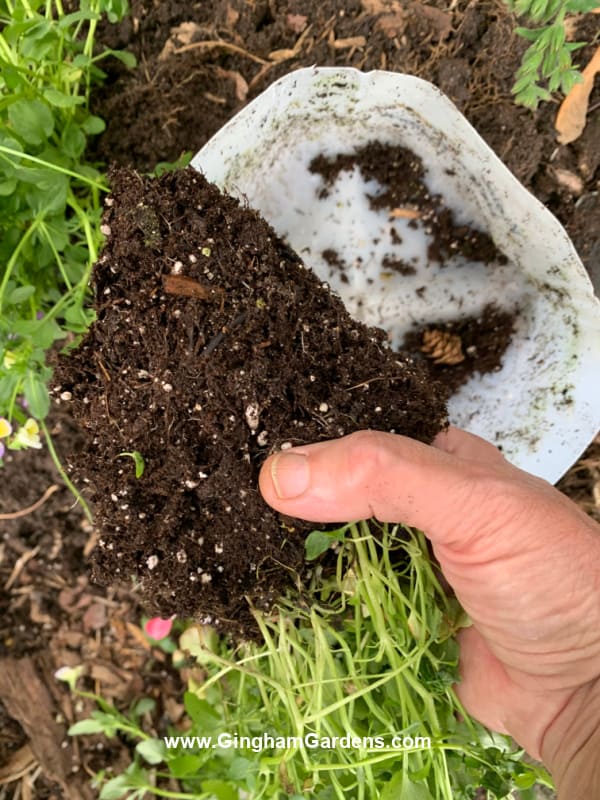
Gently remove the entire clump from it’s container. You can do this by turning the container upside down on your hand. This works best is the soil is a bit moist so that it holds together. Or you can dig sections of the seedlings out of the jug. If the root mass is really bound, you can simply cut the container away from the plants.
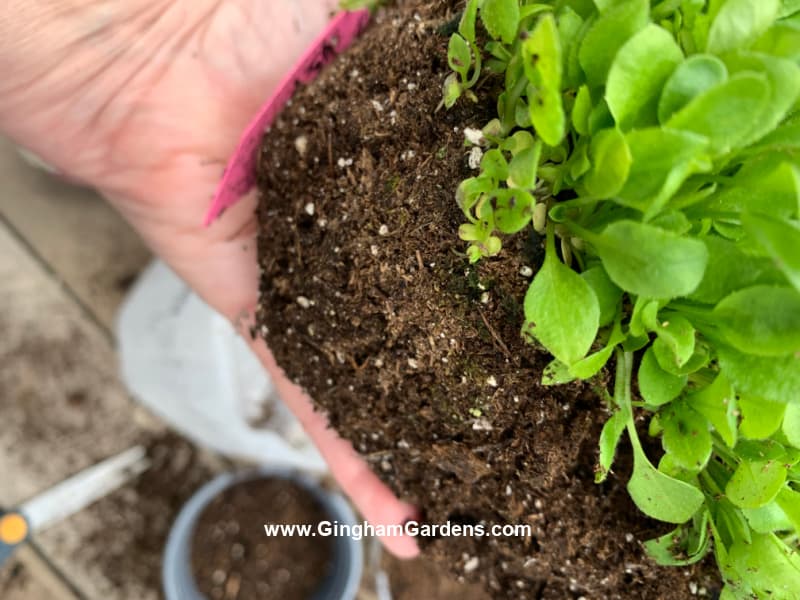
Once the clump of seedlings is removed from the winter sown container, they can be divided up and repotted, or planted directly in the garden. I like to break chunks off the main clump and plant those. Some gardeners like to pull apart the individual seedlings and pot those up. It really depends on what you are planting and how thick the seedlings are.
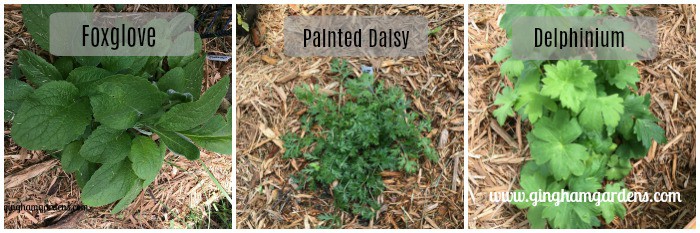
My winter sown plants are always very healthy looking plants. Here are a few of my successes from my winter sowing last winter. I’ve always wanted to have a large patch of Foxgloves, so I’m working on that patch of foxgloves by winter sowing. I’ve also had great success with Painted Daisies and the bunnies thoroughly enjoy this addition to the garden. Delphinium is another easy winter sown perennial and is always a lovely addition to any flower garden.
Depending on the perennials selected, the first year they may not flower, but the next year they will and they’ll just keep getting bigger and better each year. Is there a perennial you want to try, but don’t want to shell out the money for it? Winter sowing is a great way to get perennial plants for practically nothing. So, go ahead and give winter sowing a try; play around with it, experiment and keep track of what works best for you. You’ll be so glad you did!
And it can be a bit overwhelming if you’re new to Winter Sowing.
To make it easier to grasp, I’ve created a PDF printable Workbook/Guide
of this post, which includes all the information in this
Winter Sowing article.
Plus, some helpful planning charts and checklists
to help you be successful at Winter Sowing.
The Winter Sowing Workbook and Guide is
available for the low price of $7.00.
Simply click the button below and follow the instructions.
(Be sure to check the box to receive free updates to the Guide.)
Learn More About Winter Sowing
If you would like to learn more about winter sowing, below are some links to additional resources:
Here is the original article that got me thinking about winter sowing that appeared in the Jan/Feb 2009 edition of Northern Gardener magazine. janfeb09itssoweasy
Here is another article written by Michelle that talks about winter sowing vegetables. I haven’t done this yet, but I’m hoping to give it a try this year. 38-41.SowVeg-NG-Jan.Feb_
Trudi Davidoff, the gardener who originally came up with the concept of winter sowing, has a Facebook group dedicated to Winter Sowing.
Are you looking for some other gardening activities you can do in the winter? If so, be sure to check out these posts:
DIY Gardening Journal
Seed Starting Indoors
Winter Activities for Gardeners
How to Jumpstart Summer Blooming Bulbs
Whether or not you are a first time winter sower, or you’ve tried winter sowing, but could use a refresher, we’re here to help. Thanks a bunch for stopping by today to learn about winter sowing. Are you going to give it a try? Please leave a comment and let me know. Or, if you’ve already tried winter sowing, tell me about your successes.
Happy gardening (even in winter),
Julie
p.s. Follow Gingham Gardens on Pinterest for lots of great gardening ideas and tons of gardener’s eye candy. Gingham Gardens is also on Facebook – come say “hi.”
Pins to Share: