Flower Gardening 101
I realize that most of my readers are seasoned gardeners, but part of my desire for Gingham Gardens is to inspire folks ranging from novice gardeners to master gardeners! While Flower Gardening 101 is for beginner gardeners, I think intermediate and advanced gardeners will also come away with some fresh ideas and tips.
There are several important things to consider when you want to plant a flower garden and I’m going to do my best to break it down and give you some simple steps to follow.
What Gardening Zone Are You In?
The very first thing you need to do, if you don’t already know, is figure out what gardening zone you are in. If you can’t tell from the USDA Plant Hardiness Zone Map below, go to their website and enter your zip code in the upper right hand corner. Also be sure to read the article Cold vs Heat Zones, especially if you garden in a more southern Hardiness Zone. You will need this information when you get ready to shop for plants and you’ll need to know when it is safe to plant in early spring, the estimated last frost date in your area and how the heat of the sun will affect the plants you choose.


Garden Size
I don’t always heed my own advice, especially on garden size, but I will go ahead and say to start small! Whether this is your first garden or your tenth, it’s so much easier to start with small garden beds and then add on the next year if you want to go bigger.
If this is your first flower garden, for sure don’t go overboard! When the nitty gritty chores of weeding, deadheading and watering come around in the heat of the summer, I don’t want you to get discouraged and give up because you have too much to take care of!
We lived in our last home, which is on almost a half acre, for 30 years! When we first moved in, there were several good size trees and we added more to get some respite from the west sun. The “lawn” was terrible! To avoid such massive water bills, we put in flower beds to cut down on grass. Over the years, due to my plant collecting tendencies, we wound up with 16 flower beds that were edged with rock that Randy had scavenged.
I also let myself have a no mow zone because of certain wildflowers that came up with abandon. By the time we moved, many of the flower beds had become shade beds due to the trees reaching maturity! It was a real haven! But honestly, between work and children and caring for aging loved ones, and our social lives, it got to be too much for us to take care of.
So, don’t let your gusto ultimately take you to a place of exhaustion! I have learned that I really need to PLAN! For me, now that we’re in a new place, and I’m more than 3 decades older, I have to think about what I like/love best and be really sensible!
This post contains affiliate links. If you click on
one of the links and make a purchase,
I may receive a small commission at no additional cost to you.
See full disclosure here.
How To Prepare A Flower Bed – Selecting & Clearing A Space
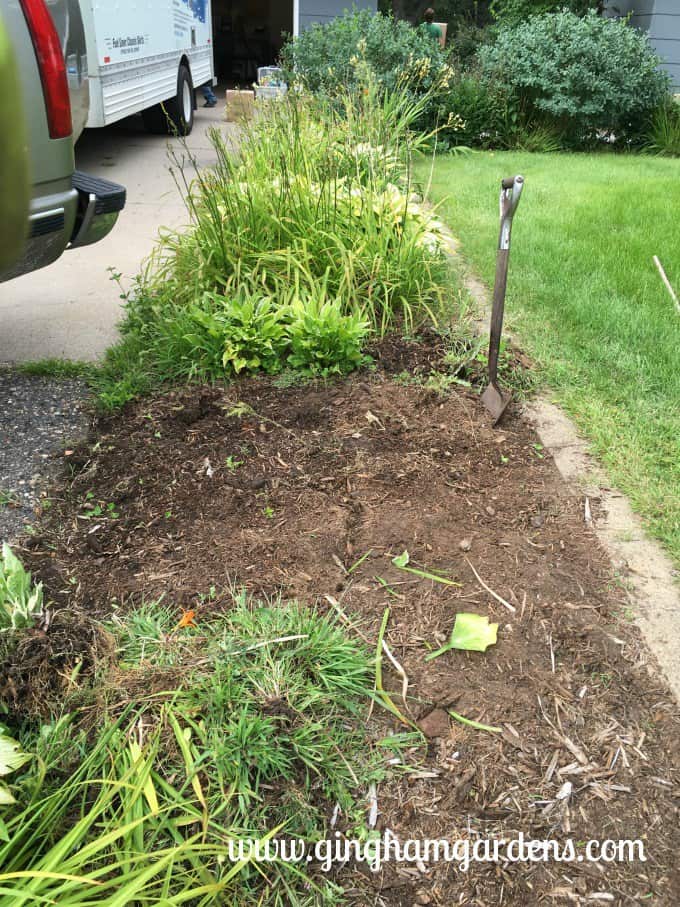
Decide where you want your new flower bed to go in your yard. Use a garden hose or rope and lay it out to mark the edge of the flower garden. Now, clear out all the grass and weeds. This is especially important if you have Bermuda grass (or any other deeply rooted grass) which is highly invasive and difficult to remove without herbicides! Ok, let’s face it, Bermuda grass is hard to control even WITH herbicides! (I’m not an herbicide person.)
At any rate, it is hard work and another reason to start small. It really helps to have a good sharp shovel that will cut through the sod and weeds. I also often use a garden fork on really hard packed soil. The tines cut through the grass (Bermuda) and soil more easily and you can pick up a larger piece of sod and shake off the soil.
If you’re in no hurry to finish your flower garden, (and you DON’T have Bermuda grass-can you tell that I hate the stuff?), rather than digging out all the sod and weeds, I would highly recommend what is called, the “lasagna method.” This is basically where cardboard or layers of newspaper are laid on top of the area where your new garden will go, and then covered with layers of grass clippings, shredded leaves and compost. The area is soaked down with water and left for several weeks to kill off the grass. It is especially effective in the fall so that the area is ready to plant the next spring.
To learn more about creating a new space for your first garden, be sure to check out – Ways to Convert Lawn Into Garden Space.

You can do the same thing if you’re dealing with an existing garden or gardening beds that have been neglected. Just follow the same steps except, in this case there may be plants you want to keep. Basically, dig up the plants you want to keep and find a shady spot to sit them in while you’re completing the steps for your new flower bed. Be sure to pull out any weeds, so you aren’t transplanting them into the new garden. Keep the transplants watered.
Other Things to Consider When Selecting a Spot for your First Garden
Be sure to keep in mind things like a water source when you’re thinking about where your flower garden will go. Also, will you be able to see the garden from indoors? It’s nice to be able to look out a window and see your own flower garden full of vibrant color! If you have limited space, a great way to achieve a flower garden is with a raised bed or container gardens!
Sun Exposure
After you have a spot cleared out for your new flower garden, determine how much sunlight it gets. Is there shade all day, is there shade in the morning and sun in the afternoon, or is it in full sun? Are the surrounding trees fully leafed out? This step is important because you need to know sun exposure when you get ready to select plants.
- Full Sun: This area will get at least 6 hours of direct sunlight throughout the day.
- Partial Sun | Partial Shade: These terms are similar and generally mean an area that gets 3 to 6 hours of sun per day. Part sun is an area that gets closer to 6 hours of sun. Partial shade is an area that gets closer to 3 hours of sun, and is also protected from the intense afternoon sun. Another term in this category is “Dappled Sun”, which means the sun is filtered through tree or shrubs, fence slats, pergolas, etc.
- Shade | Full Shade: Shade refers to an area that receives less than 3 hours of direct sunlight each day, with most of the sun exposure occurring during either early morning, very late afternoon, or dappled throughout the day. (Do keep in mind that if you live in a hot climate, a blast of 5 o’clock summer sun can be deadly!) Full shade is an area that doesn’t get any direct sun exposure, but might receive some bright, indirect light.
Preparing the Soil for Planting
Let’s talk dirt for a minute. To ensure that you have a successful first growing season, good soil matters! No matter what soil type you have, whether it’s clay soil or sandy soil, adding in good organic matter every year will go a long way towards achieving healthy soil. And healthy soil equals healthy plants!
Organic matter is just another word for compost. I would highly suggest adding a layer of 3 or 4 inches of compost on top of your existing soil before you plant. Check to see if there is a compost site available in your county, where you can pick up free compost. If not, it’s easy and inexpensive to purchase bagged compost at most big box stores.
At some point, if you decide you want to do more gardening, getting a soil test would be a smart thing to do. A soil test will simply help you know what nutrients are missing from your garden soil and how to fertilize it. I like to keep it simple, and either way, adding a good compost mix will go a long way to improve your soil. Once you have added the compost, rake over the entire area to level it out. Now you have a blank slate with which to design your beautiful garden!
Types of Flowers – Perennials vs. Annuals
In order to be able to make the best choice for the right plants for your garden, it is important to know the differences between perennial flowers and annual flowers, or the type of plant you are dealing with.
Perennials:
- Perennial flowers live longer than 2 years.
- Because you basically plant them once, your garden in general will require lower maintenance once the perennial plants become established.
- Although perennial plants are more expensive to purchase at first, in the long run they are less expensive because you aren’t replanting them every year.
- The time of bloom for perennial plants is generally shorter than annual flowers.
- Because perennial plants go dormant during winter months, it is important to select perennials that are hardy to your gardening zone like we talked about above.
Annuals:
- Annual plants only live one growing season, so you will need to plant them every spring.
- Plant that are sold as annuals are generally cheaper than perennial plants, but only last one season.
- Annual flowers are a good choice if you want loads of consistent color and blooms all season.
Pro Tip: It’s totally fine to include annual flowers and perennials flowers together in the same flower bed. Most experienced flower gardeners, including myself, do it.
The Easiest Flowers to Grow
Annuals (flowers that have to be planted every year) for Sun:
- Marigolds
- Snapdragons
- Zinnias
- Alyssum
- Vinca
- Geraniums
- Cosmos
- Sunflowers
Perennials (flowers that come back every year) for Sun:
- Shasta Daisies
- Coneflowers
- Daylilies
- Salvia
- Catmint
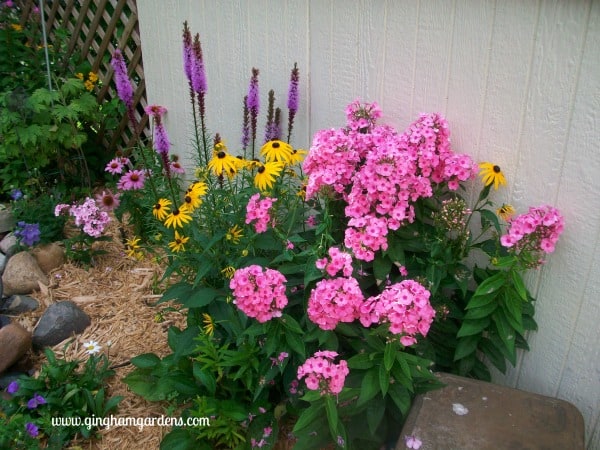
- Tall Garden Phlox
- Black-eyed Susan
- Geranium
To see a list of the Best Shade Flowers, be sure to pop over and read Made In The Shade Gardens.
There’s a lot of great information in this post!
To make it easier to grasp, I’ve created a PDF printable Workbook/Guide
of this post, which includes all the information in this
Flower Gardening 101 article, plus more helpful information and tips,
some planning pages, graphs and other checklists
to get you started on your way to becoming the
flower gardener you’ve always wanted to be.
The new updated Flower Gardening 101 Guide & Workbook is
available for the low introductory price of $7.00.
Simply click the button below and follow the instructions.
Be sure to click the box to receive free updates of the book.

How to Design a Flower Bed
I debated whether or not to move this section up higher in the list, but this is the way I do it, so I’ll stick with this. Oh how I love this stage. Take a break from the manual labor of getting the bed ready to plant and sit down with a pencil and paper. I have some simple graph paper and a handy garden project printable in my Free Gardening Printables Resource Library, so help yourself. Sketch out your new flower bed. Using the simple rules of thumb below, graph out where your plants will be. Remember to stagger plants so you don’t have one in front of the other and no straight rows.
Now, it’s time to do a little research. I have a list of Easy to Grow Perennials in the Free Gardening Printables Resource Library to help you with plant selection. Along with your perennials, fill in with annuals for color throughout the summer. Refer to the lists above. I’m not a garden designer, but there are some general rules of thumb that I follow:
- What is the shape of your flower bed? If it’s an island type bed, you’ll want to plant tall plants in the middle and work your way down with the shortest plants on the outside borders. The goal here is to be able to walk around the bed and be able to see all the different plants with none blocking the view of others.
- If it’s a foundation or border bed (like on the edge of a building, a deck or fence, etc.), start with your tallest plants closest to the foundation and work your way down with the shortest plants on the outside edges of the bed.
If you follow these simple rules of thumb, you’ll create a flower garden that’s pleasing to the eye.
As you continue to learn, there are other things to take into account when designing, like flower color, texture and bloom time. Don’t worry about those things your first year and don’t fret too much over your design. The beauty of perennial gardening is you can move most plants if you don’t like where they are. Trust me, I do this a lot. And, as I say, there’s always next year, and the best way to learn is just by doing something. I recommend taking a few minutes to read Flower Garden Design, as it has some great tips.
Flower Gardening 101 – How to Shop for Flowers and Perennial Plants
Before you head to your local garden center, take some time to do a little research and get a good idea of what you want to buy. Be sure to make lists and take your sketches too. Going to a nursery can be overwhelming even for a seasoned gardener like me. I highly recommend taking some time to read Plant Shopping 101.

Flower Gardening 101 – How to Plant Flowers
Now the real fun begins, we’re done shopping and we’re ready to plant. Pull out the diagram you made and make any revisions by using the tags from the plants you purchased. Note that the plants you purchased are likely not full grown, so refer to the plant label and go by the size on the label. Now place your plants (pot and all) in the space where you want them. When you’re done placing the plants in position according to your diagram, step back, take a look and rearrange as needed. When you’re satisfied, it’s time to start digging and get your hands dirty.
For planting, since every plant is different and planting requirements are different, I would highly recommend reading and following the instructions on the plant label. But basically, you dig a hole about twice the size of the root ball of your plant. Gently massage the root ball to loosen it. This is especially important if the plant you bought has overgrown roots that have filled the pot. If you purchased a plant already in flower, there is a likelihood that the plant is root bound. The compressed root ball makes it more difficult for the new plant’s roots to integrate into their new home. Now, place your plant in the freshly dug hole. Back fill with the soil you initially dug out, making sure there are not air pockets, and gently tamp the soil down around the plant. If your soil isn’t great, I would recommend mixing in additional compost with the existing soil. After you’ve finished planting and leveled out any piles of excess soil, give your new plants a good deep soaking.
There’s a lot of great information in this post!
To make it easier to grasp, I’ve created a PDF printable Workbook/Guide
of this post, which includes all the information in this
Flower Gardening 101 article, plus more helpful information and tips,
some planning pages, graphs and other checklists
to get you started on your way to becoming the
flower gardener you’ve always wanted to be.
The new updated Flower Gardening 101 Guide & Workbook is
available for the low introductory price of $7.00.
Simply click the button below and follow the instructions.
Be sure to click the box to receive free updates of the book.
The Best Gardening Tools for Flower Gardening
It’s tough when you’re starting out to be able to afford all the gardening equipment and tools, the plants, the mulch and the decor pieces. This is just another reason to start small. You can pick up many really good gardening items at garage sales for pennies on the dollar of the original cost. However, when it comes to gardening equipment and tools, just don’t go with cheap to get you started. You’ll end up replacing cheap gardening tools many times, versus buying quality tools and equipment that will last you for years to come.
Here are my favorite gardening tools to get you started:
You’ll need a good pair of both heavy duty gardening gloves and lightweight gardening gloves. I am not fond of gloves, but I have multiple pairs of each of these and I love them.
This shovel is amazing! It’s lightweight, but good and sturdy. I have the pink one, but it does come in more manly colors too. And as I already mentioned, I love a sturdy garden fork! It has saved me a lot of effort in digging into Bermuda grass! A rake is also a must have gardening tool and I love this adjustable rake. It makes it easy to get around plants in my flower gardens.
Definitely invest in a good set of hand gardening tools. I have tons of hand gardening tools, but this is my go-to set.
Totally not a necessity, but this gardening cap is adorable and practical all at the same time. Lastly, but for many very important, is a kneeling pad to save your knees.
Putting the Finishing Touches On Your New Flower Garden
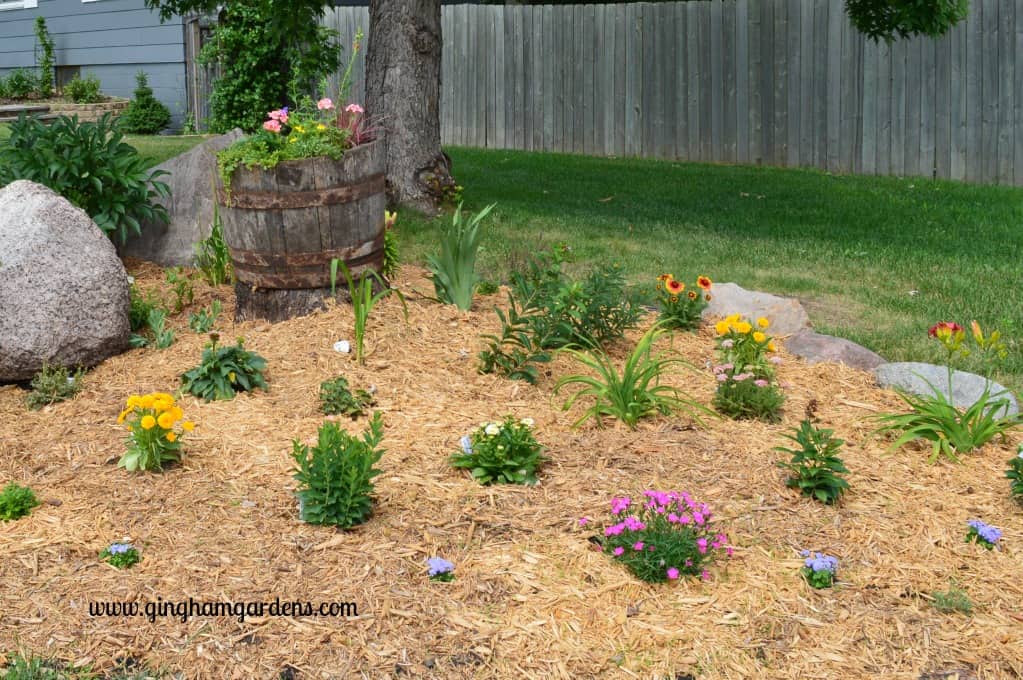
As far as I’m concerned, mulch is not an option. Adding a good layer (at least 2 inches) of mulch is like the icing on a cake. Not only is mulch aesthetically pleasing, it helps the soil to retain moisture and it keeps weeds at bay. Don’t use a colored or rubber mulch product. They don’t break down like mulch is supposed to and who knows what kind of chemicals leach into the ground from these mulches! I personally use and recommend a finely shredded hardwood mulch. If you can’t afford a good, shredded mulch, you can use untreated, dry grass clippings.
The picture below of a brand new, baby flower garden (all mulched and pretty), is what you should expect your new garden to look like, as opposed to the pictures above. Notice how sparse the plants look, I left lots of room for these babies to fill out and grow up. A few years later, this flower bed is gorgeous and full of color.
- Edging – I would highly recommend adding edging around your new flower garden. It really helps to define the borders between your bed and the lawn. I use a lot of field stones around the edges of my flower beds, but I’ve also used this type of edging and this one. They both work very well at keeping the edge of your flower bed defined.
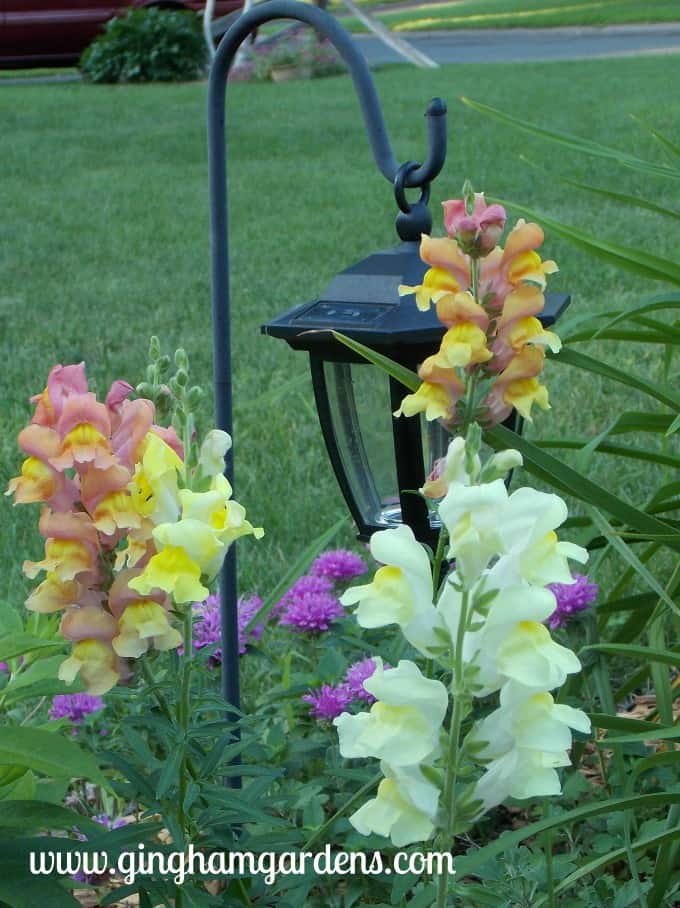
- Decor – This is one of my favorite things to do in the garden, whether it’s creating little vignettes from vintage items, or just adding a touch of whimsy here or there. I also like solar lights to add ambiance to the gardens at night and the lantern style pictured below looks cute during the daytime too. I also love to use natural elements like large stones or logs. Play around with adding some decor, find your own style and just have fun with it. If you need some ideas, check out some other posts here at Gingham Gardens.
Flower Gardening 101 – Dealing With Pests In Your Garden
I debated whether to even include this section, but it’s part of gardening so here goes. I want you to know up front that you will be dealing with pests, whether it’s bugs, rabbits or deer, that like to eat your plants. Or maybe, just maybe, you’ll have beginner’s luck and you won’t have to deal with any of this your first year.
Just be prepared that this could be a possibility, but don’t freak out and go buy every pesticide you can get your hands on. Please. Just don’t do pesticides! Part of being a good gardener, is to take care of your own little patch of earth in a prudent and environmentally friendly way. Pesticides are just bad for you, and they kill the bees, butterflies and other nice bugs. If you do feel like you need to control pests, at least start with organic. Okay there, my little rant is over. Here is a post I wrote with lots of practical tips for controlling pests in your gardens.
How to Take Care of Your New Garden
Although this is a very detailed post for new gardeners, I believe with a little planning and reading, you will have a great start to a your first successful flower garden.
There are many great ideas and posts here on Gingham Gardens to help you be successful, be sure to read: Flower Garden Maintenance, How to Deal with Weeds in Your Garden and How to Efficiently Water Your Garden.
We’ve only covered perennials and annuals in Flower Gardening 101, but there are many, many other types of flowers that you can add to your flower garden as you learn and become more comfortable. Depending on your gardening zone, you can add bulbs for bloom during different seasons. Plant tulips and daffodils, etc. in the fall for spring color. Plant lily bulbs in the fall or spring for summer flowers. And, there are irises and alliums, and the many other types of flowering bulbs. Hang with me and we’ll cover lots more here on Gingham Gardens.
Thanks a bunch for taking time to stop by today and read Flower Gardening 101. I hope you learned something, or are taking away some new ideas to try. For some tips on taking care of your flower garden, check out this article: Flower Garden Maintenance.
I’d like to know you better- are you a seasoned flower gardener, or a newbie gardener? What are you planning in the way of gardening this summer? Please leave a comment, or your gardening questions in the comment box below.
Happy Gardening,
Julie
p.s. Go ahead and feel free to “pin” these pictures. If you hover in the upper left-hand corner of the picture, you’ll see the little Pinterest icon. Just click it and pin away. There are also pins to share at the bottom of the page. Thanks a bunch!
p.p.s I’d love to have you follow me on Pinterest. Lots of great gardening ideas and tons of gardener’s eye candy.
Pin to Share on Pinterest: