How to Make Potpourri Using Flowers From Your Garden
Potpourri is a delightful way to bring your flower garden’s beauty indoors. It is a beautiful, fragrant mixture of dried flowers, herbs, and spices that can be used to freshen up any room. Making potpourri from your garden is easy, and it makes a wonderful gift for friends or family members that are hard to buy for, hostess gifts, girlfriend gifts, teachers’ gifts, or to just enjoy in your own home. Follow along and learn how to make potpourri with fresh flowers from your garden.

The making of potpourri can be traced all the way back to medieval times. It has historically been used to mask body odors, as air fresheners in homes with no plumbing (gross), to ward off evil spirits, for health purposes and much more. We’re just going to stick with the fun part of making potpourri with flowers we grew in our own flower gardens.
Homemade potpourri is so much better than mass-produced, store-bought potpourri. When you make it yourself, you control what goes into it and there are no artificial dies or cheap fragrance oils.
The possibilities of the dried herbs, flowers, seed and pods you include in your mix are endless. Yes, you can simply choose fragrant flowers and herbs, but the drying process tends to weaken the fragrance of your flowers. Leaving dried flowers exposed to air will also weaken their fragrance. I tend to select plants for their color and then add my favorite essential oils to the mix of dried plant materials.
This post contains affiliate links. If you click on
one of the links and make a purchase,
I may receive a small commission at no additional cost to you.
See full disclosure here.
Potpourri Ingredients
Although many of these basic ingredients can be purchased at a craft store like Hobby Lobby or Michael’s, for convenience I am including Amazon links to the supplies as well.
Dried flowers and flower petals
Dried herbs such as lavender, lemon balm, lemon verbena, rosemary and many more.
Eucalyptus leaves
Dried rose hips or rose buds
Seed heads and Seed pods
Dried fruit slices
Small pine cones
Orris Root Powder – unless you are going to make lots of potpourri, you only need a small amount
Essential Oils – These are my favorite pure, therapeutic grade essential oils.
Silica Gel Flower Drying Crystals – unless you are going to make lots of potpourri, 2 pounds is likely sufficient.
Gloves and a Mask
Flat bottom microwave safe dish or baking sheet
Parchment paper

What Flowers Work Best for Drying to Make Potpourri
Flowers that did not dry well include snapdragons, alyssum, vinca petunias, and verbena. I also tried a few marigolds, but the smell was terrible, so I discarded them.
Flowers that worked well for drying were mums, small dahlias, gomphrena, celosia, rose petals and rose buds, salvia, silver mound, etc. These flowers held their color and shape the best.
Don’t let my experience deter you from trying a flower though. Experiment and find what works best for you.
How to Dry Herbs and Flowers for Making Potpourri
First, you’ll need some fresh herbs and flowers. Although I prefer selecting blooms right from my garden, using purchased bouquets works too. If you’re making potpourri during winter, store-bought bouquets with a variety of flowers are perfect.
Pro Tip: It takes lots and lots of flowers and petals to make potpourri. When flowers dry, they shrink, so pick way more flowers than you think you will need.
Just use the flower heads (or florets) and clip off the stems and leaves. I found that for making potpourri, just the flowers worked best. I tried using the leaves, but they got too dry and crumbly.
It’s important to take necessary safety precautions like a mask (so you don’t breath in the dust from the silica powder) and latex or rubber gloves to protect your skin.
There are several ways to dry herbs and flowers, but we will touch on a few of the most popular ways.

Drying Flowers with Silica Gel in the Microwave
This is hands down the easiest and fastest method to dry flowers! It’s my method of choice and the method we will focus on. I also found that the flowers retained their vibrant colors beautifully.
It really helps to sort your flowers by size and dryness factor. For example: I sorted out the flowers that already tend to be dry, like strawflowers, hydrangea flowers, gomphrena and statice. These don’t require as much time in the microwave.
Next, sort the remainder of your flowers by size. I found it easiest to microwave my flowers in small batches.
Start by pouring about 1 – 1.5 inches of silica gel into a microwave safe container and then layer your flowers face up. Use a baking dish with a flat bottom.

Add more silica gel crystals on top of the flowers, but don’t completely cover them.

Place the dish in the microwave, along with a cup of water. Microwave for 1-3 minutes on Power Level 5 (medium), checking the flowers for dryness every 45 – 60 seconds. The cup of water is to help prevent your flowers from scorching.

Carefully remove the dish from the microwave using potholders and allow the flowers to cool completely in the silica powder.
I used a plastic fork to move the flowers from the silica to a sheet of parchment paper. Even though the silica gel comes with a brush, I found it nearly impossible to brush all the extra powder from the dried flowers. It worked much better to dump the flowers in a mesh strainer and shake it gently to remove most of the silica.
Next, add your dried and cooled flowers to a glass bowl. If some of the flowers are large, go ahead and break them apart.
You can continue to use the same silica gel powder to dry several batches of flowers. Once you are comfortable using the microwave to dry your flowers, you can experiment with the settings and extend the time intervals.

How to Air Dry Flowers
Air drying is the most traditional and straightforward method of drying your ingredients. It involves hanging your herbs and flowers upside down in a warm, dry, and well-ventilated area. Here are the steps to follow:
-
Gather your herbs and flowers in small bunches and tie them with a string or rubber band.
-
Hang the bunches upside down in a warm, dry, and well-ventilated area, away from direct sunlight.
-
Leave the herbs and flowers to dry for 1-2 weeks, depending on the humidity level in your room.
-
Check the herbs and flowers regularly to make sure they are drying and not developing mold or mildew.
-
Once the herbs and flowers are completely dry, remove the leaves and petals from the stems and store them in an airtight container until you are ready to use them.
Save a Pin to your Favorite DIY board on Pinterest, so you can remember this post later.

Oven Drying Herbs and Flowers for Making Potpourri
Oven drying is faster than air drying, but it requires more attention to prevent burning. If you have the patience and the time and want a super cheap method for drying flowers, oven drying may be for you. Here are the steps to follow:
-
Preheat your oven to the lowest temperature setting.
-
Spread your herbs and flowers on a cookie sheet lined with parchment paper, making sure they are not touching.
-
Place the baking sheet in the oven and leave the door slightly open to allow for air circulation. If you have an oven with an air fryer or convection setting, you might want to play around with those settings.
-
Check the herbs and flowers regularly and remove any that are fully dry. This can take several hours.
-
Once all the herbs and flowers are dry, remove them from the oven and let them cool completely.
-
Store the dried leaves and petals in an airtight container until ready to use.
If you have the time and patience, it’s fun to experiment with different drying methods to find the one that works best for you and your particular ingredients. Also if you are using filler items like twigs, pine cones, cinnamon sticks, etc., those items are already dry and will not need to be dried further.
The printable instructions for making potpourri using the microwave method, along with some cute printable tags and jar lid covers are available in the Gardening Resources Library. Get free access by completing the subscription form below.
How to Make Potpourri
Once you’ve gone through the work of drying your flowers, the rest is quick and easy.
Take your completely cooled and dried flower heads and place them in a large bowl that has a lid.

Next, add a few drops of an essential oil of your choice. The amount you add greatly depends on the strength of the particular essential oil you are using and the amount of dried flowers you are using. Start on the light side because you can always add more essential oils.
Important Step: Orris root powder is a fixative that binds the essential oil to your dried flowers and helps the fragrance to last. Don’t skip this step. If you are making a small batch of potpourri, say like 4-5 cups, add around 2-3 teaspoons of orris root powder to the bowl with your dried flowers and essential oil. Put the lid on the mix and shake it well.
That’s it, you just made potpourri with flowers from your garden! Check out this post for some simple instructions for making fresh Christmas potpourri and more fun DIY natural Christmas decorations.
Here are more DIY posts you will enjoy:
DIY Gifts From Your Garden
Christmas DIY Projects Using Tree Branches
How to Make Soy Candles (an easy DIY)
A few final steps and ideas for your homemade potpourri:
It’s a good idea to store the potpourri mix in an airtight container. I recommend using glass because the fragrance won’t seep into the container like it will if it’s plastic. Allow the potpourri to sit in the sealer container in a dark place for a few days before using it.
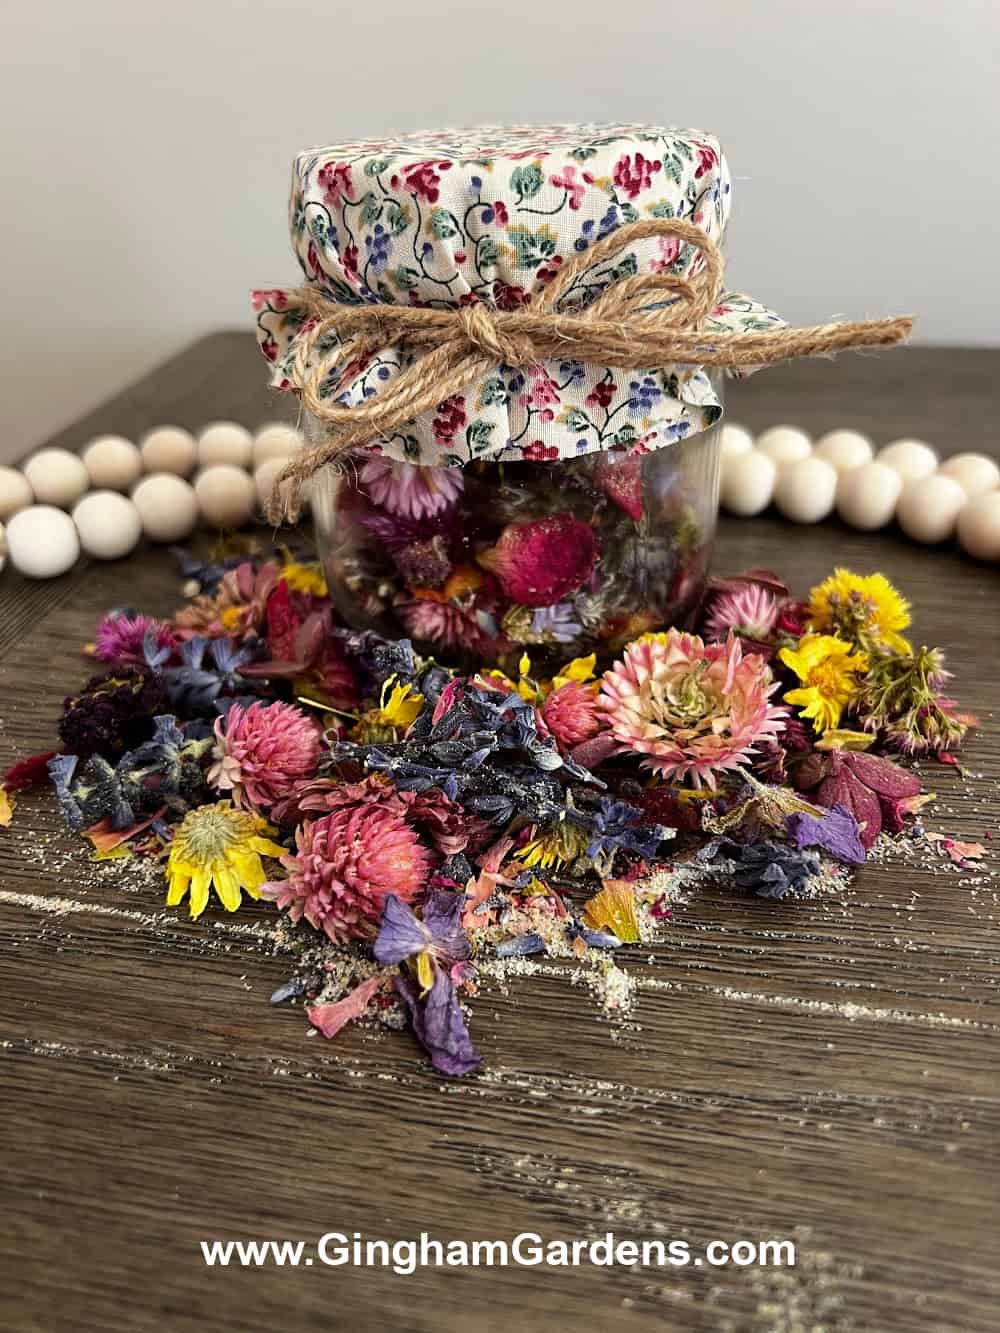
If you are making the potpourri for gift-giving, add some to a glass jar and tie a ribbon around the jar.

Adding potpourri to sachet bags is a great way to make several small gifts at once. They can be used in closets, cars or any small space.
These frog lids work really well on mason jars and create an opening for the fragrance to escape.
When the fragrance begins to dissipate, add a few drops of essential oil at a time until you get it to the fragrance level you like.
I hope you enjoyed this tutorial for making potpourri with flowers from your garden. It’s such a great way to enjoy your garden flowers, especially at the end of the growing season. Try it and I think you’ll agree that making your own potpourri using flowers from your garden is a fun and easy DIY project. Leave a comment below and let me know if you’ve made potpourri, or if you have any questions.
Happy gardening,
Julie
More Great Things on Gingham Gardens
Sign up to receive our weekly newsletters full of gardening tips. You’ll also get access to our Gardening Resources Library and all our helpful gardening printables.
More places to find Gingham Gardens:
- Visit Gingham Gardens on Pinterest.
- If you’re on Facebook, Gingham Gardens is also on Facebook.
- Stop by Gingham Gardens’ Amazon store!
- Love all things gardening? Check out our shop!
Save a pin to your gardening board on Pinterest, so you can remember this post later:

